
Lesson 7 - How to Setup and Manage Projects

Bulletproof Notion Work Management System
For Accountants and Bookkeepers
You’ll find the Projects section in the main menu, where there is what is called a “Gallery View” by default. You can change this, but I think you’ll find that if you take the time to choose an appropriate cover image for each project that makes each project distinct, you will see the wisdom of my suggestion that you keep it this way.
Later in the course you will learn how you can create other views and layouts for this and any other database.
Here are the project templates you have in your master template:
- BPN Banking Template
- Client Onboarding Template
- Project Management - General
- Referral Source Template
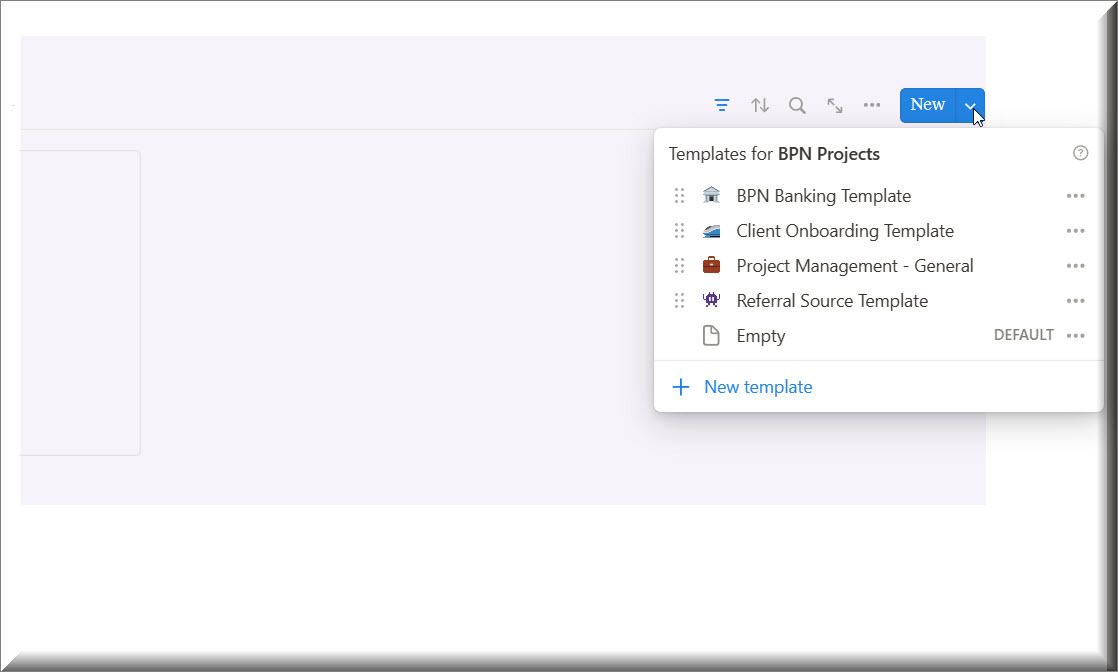
I will cover these in the order you are likely going to want to use them.
Client Onboarding Template
This is likely the first thing you will want to do when you bring on each new client.
Note the SOP near the bottom. This is meant to be a guide for you, so that you can begin adding tasks and notes at the top.

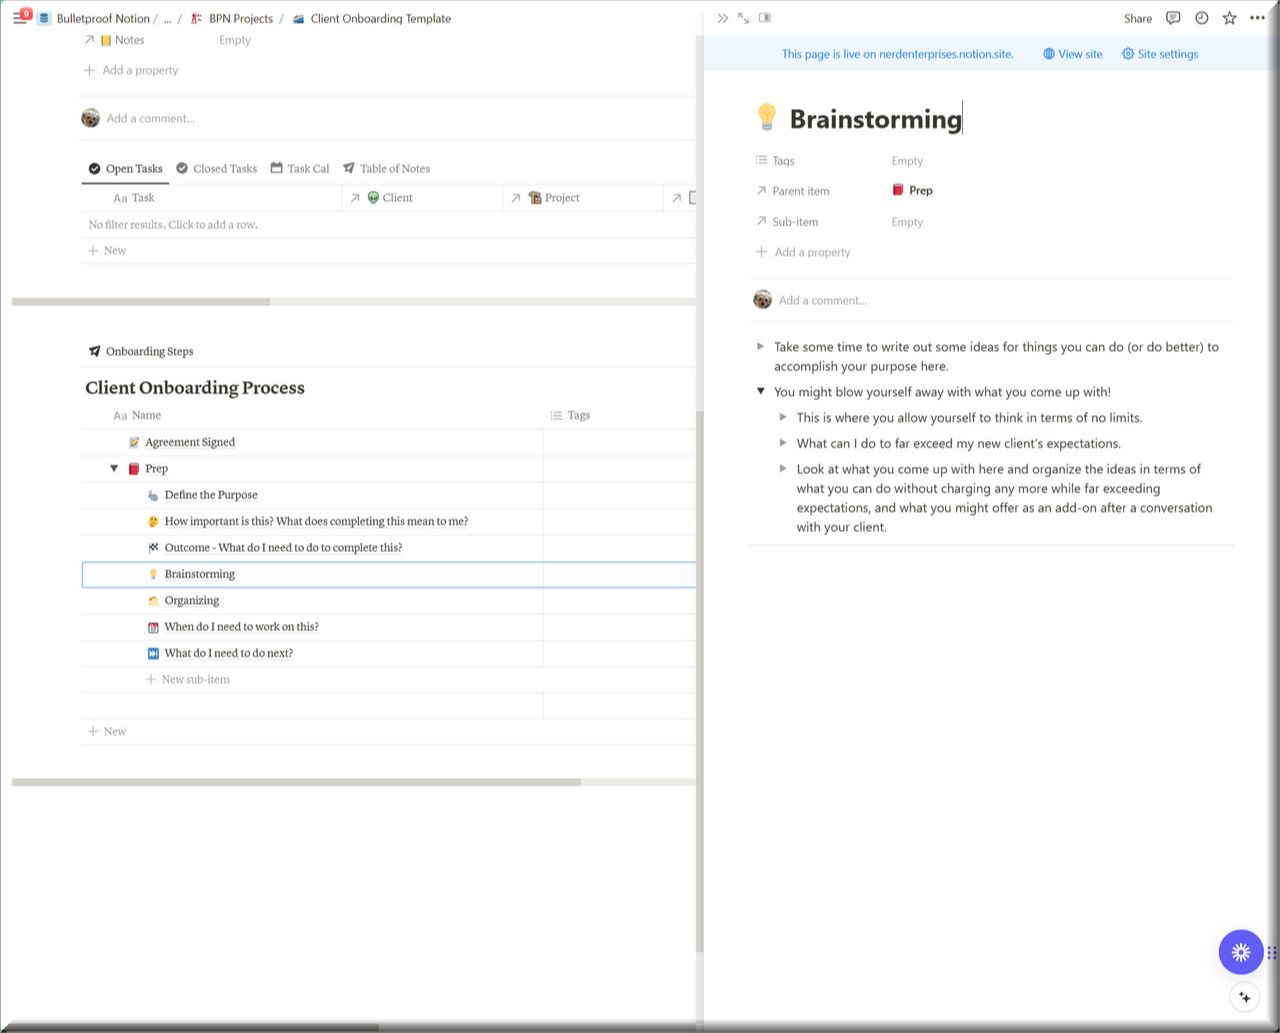
When you expand the Prep line, you can see all of the steps I’ve outlined. Of course this is pretty generic, so feel free to add your own touches, but keep in mind that the bottom section there is only a guide (SOP), it’s the above section where you capture the actions that need to be completed as well as the notes (reference information).
Open each of the sections under Prep to answer the questions I’ve laid out. It may seem like overkill, but I promise you when you experience the clarity this will give you, it will not be overkill.
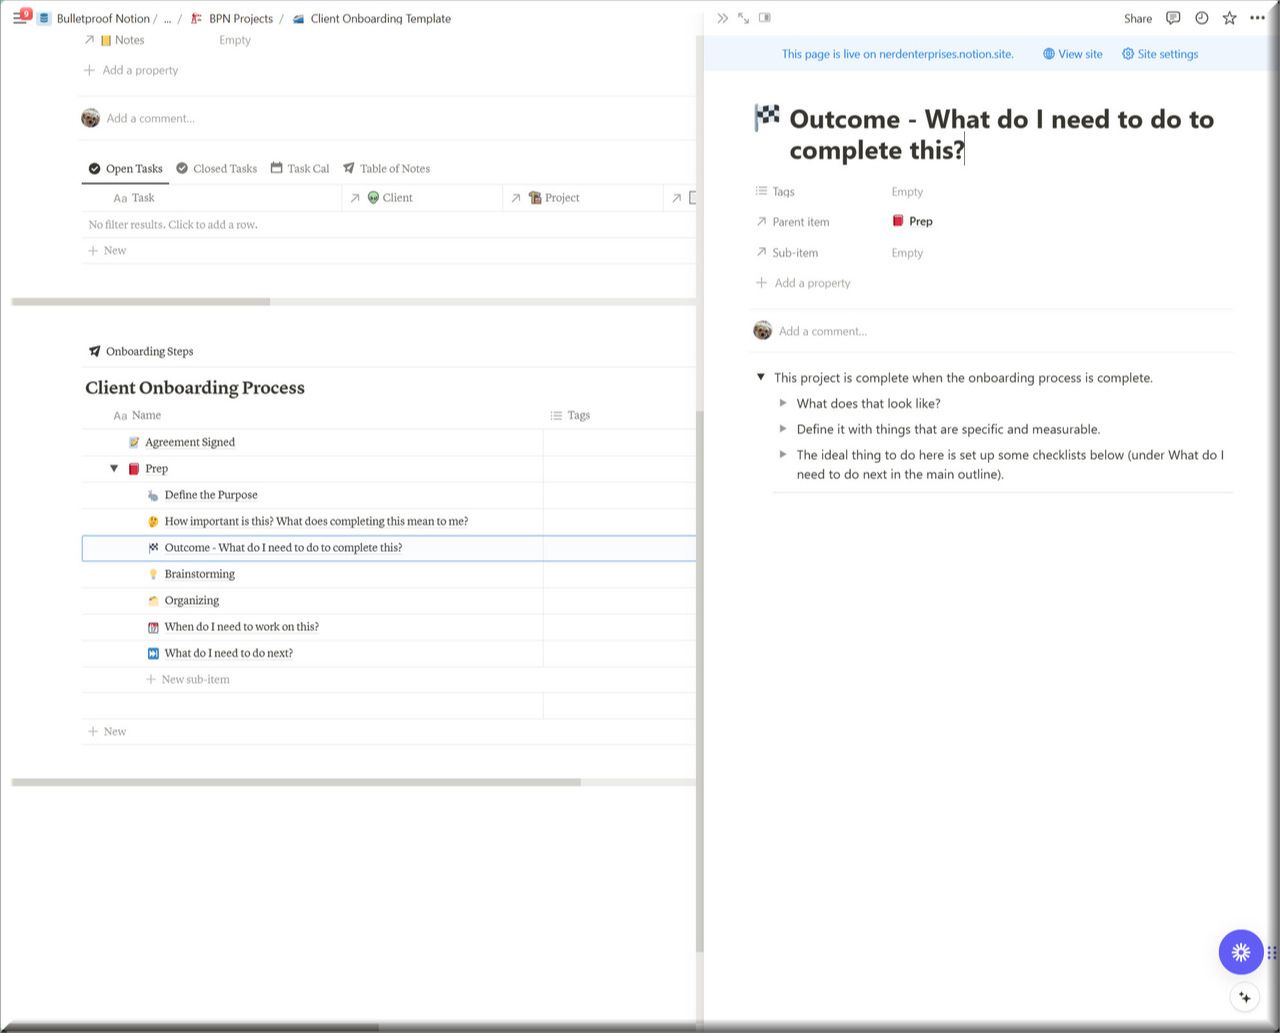
I’m using Outcome as one example. Go in between the lines and answer these questions.
Don’t blow off the brainstorming one. This can actually be a lot of fun, because you effectively remove any limitations in your mind and get creative about what you can do for this client.
The goal is always to exceed expectations, and this is the exact place where you can define how you will do that.
This should be enough to give you an idea of what to do at the bottom.
Now let’s focus on the top.
You’ve already learned how to manage tasks and notes. Now you’re doing it all from within a project. It’s the same database, but each new task or note you add above will automatically be assigned to this project. As long as you are in this project you will only see tasks, and notes assigned to this project.
Later in the course you will learn how you can add other views (like bookmarks) in case you want to have project specific bookmarks showing up here. I did not set it up this way, because it might be overkill to assign bookmarks to every single project that they might be used with.
You do have the ability to assign bookmarks to your client.
Let’s see what it looks like when we set up our first onboarding tasks, which likely will be to schedule the onboarding call with the client. This way you can see both a task and a note utilized for this.
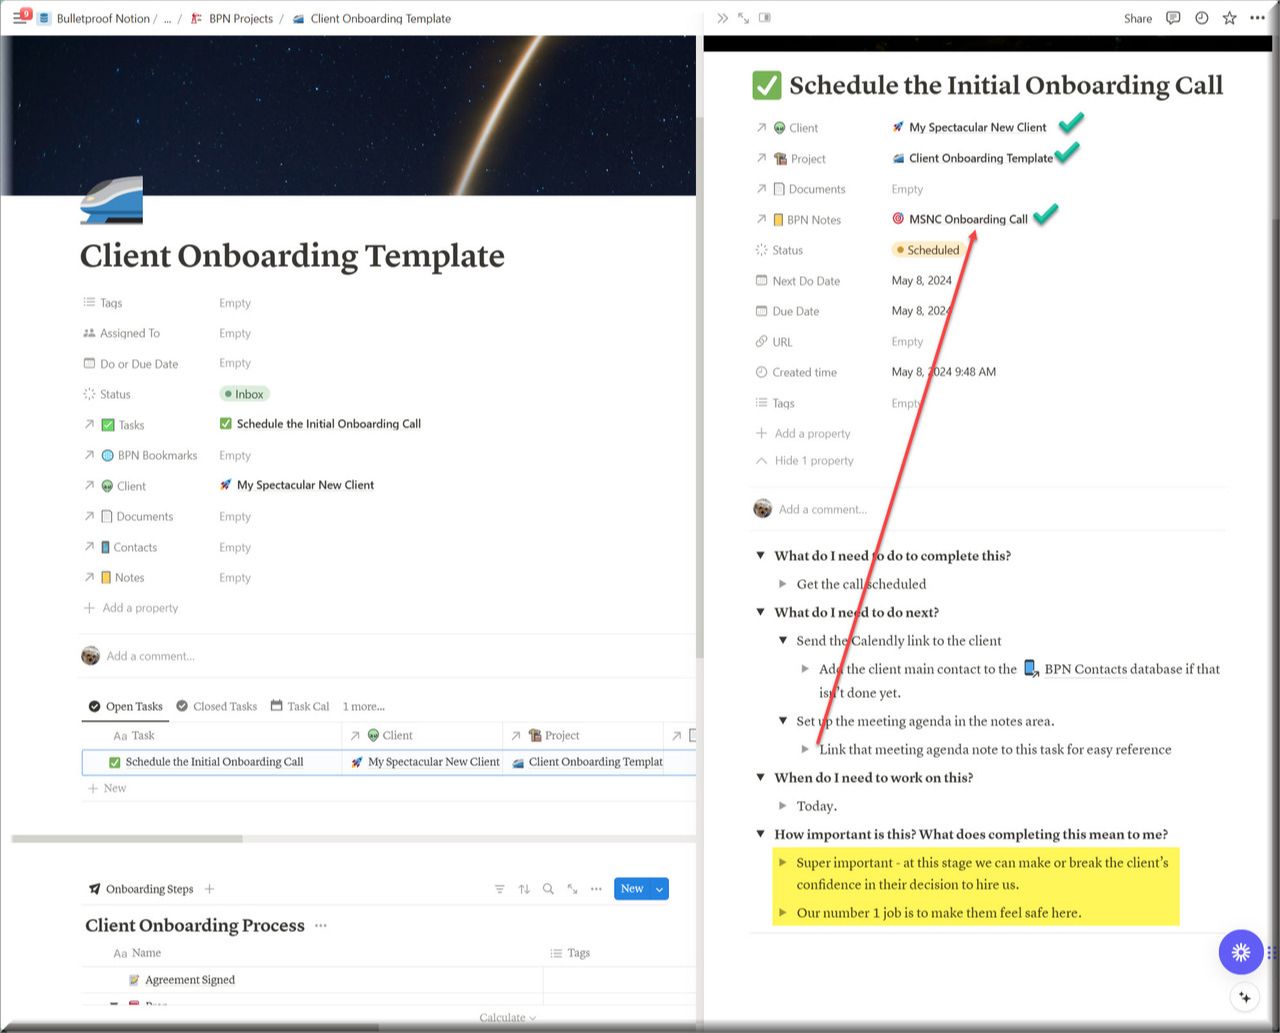
The project will automatically get assigned, because you created it from a view that was filtered for this project. But the client will not automatically be assigned, nor will much else, so bottom line, clarify this and every task by going through each of the properties and make sure everything you need is filled in.
Normally you would make any “notes” about the task in the task itself - no need to create something separate, but the Meeting Agenda / Notes is a separate, but related animal, so in this case I am showing you how it’s linked. I created it by clicking right in there at the top, then I CTRL+[click]ed it to update it real quick.
Here’s what that note looks like:
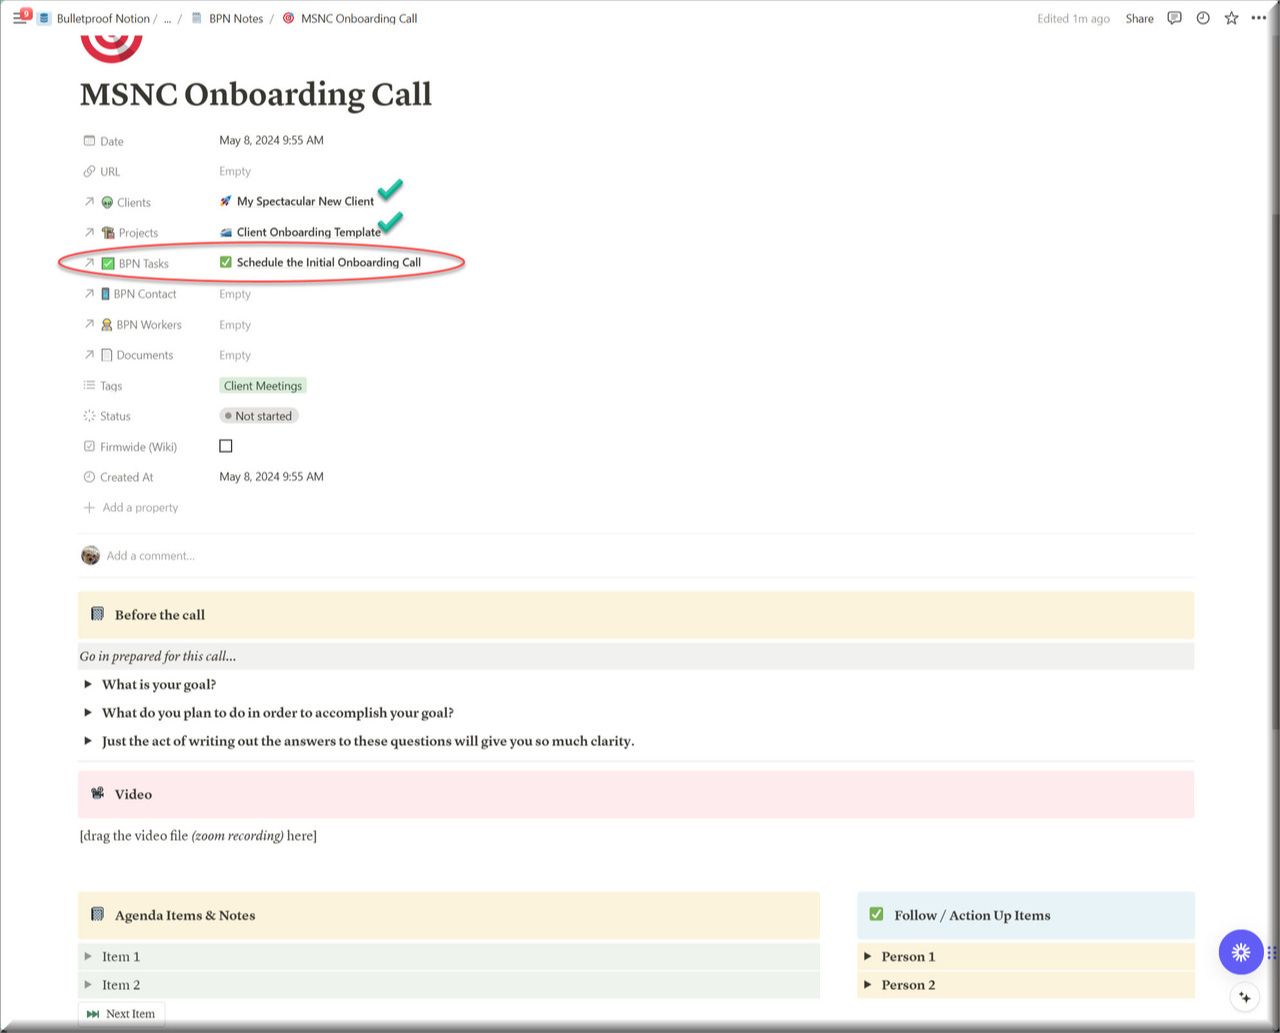
You might even go back to the task and add an item under What to do next reminding yourself that once the meeting date and time is confirmed (and that task is now complete), you should update the meeting agenda with the scheduled date and time.
Then add a new task (if you haven’t yet) to “prepare for the meeting” and of course clarify what that means.
As you can see this template will make it very easy to manage everything that comes up during the onboarding process so you can track what needs to be done, when, and by whom.
This will reduce if not remove stress, because you will never have to worry about it. If you need to know what is going on, and most importantly what needs to be done next, all you need to do is open this project in Notion and you’ll have your answer in an instant!
Project Management - General
If you followed the process for the onboarding template, this one is exactly the same, just simpler and more generic.
Here you will notice that you do have bookmarks (and I’ve added that to the onboarding template now as well).
The process is exactly the same.
Clarify your project, the same way you do with any task using the SOP at the bottom of the template:
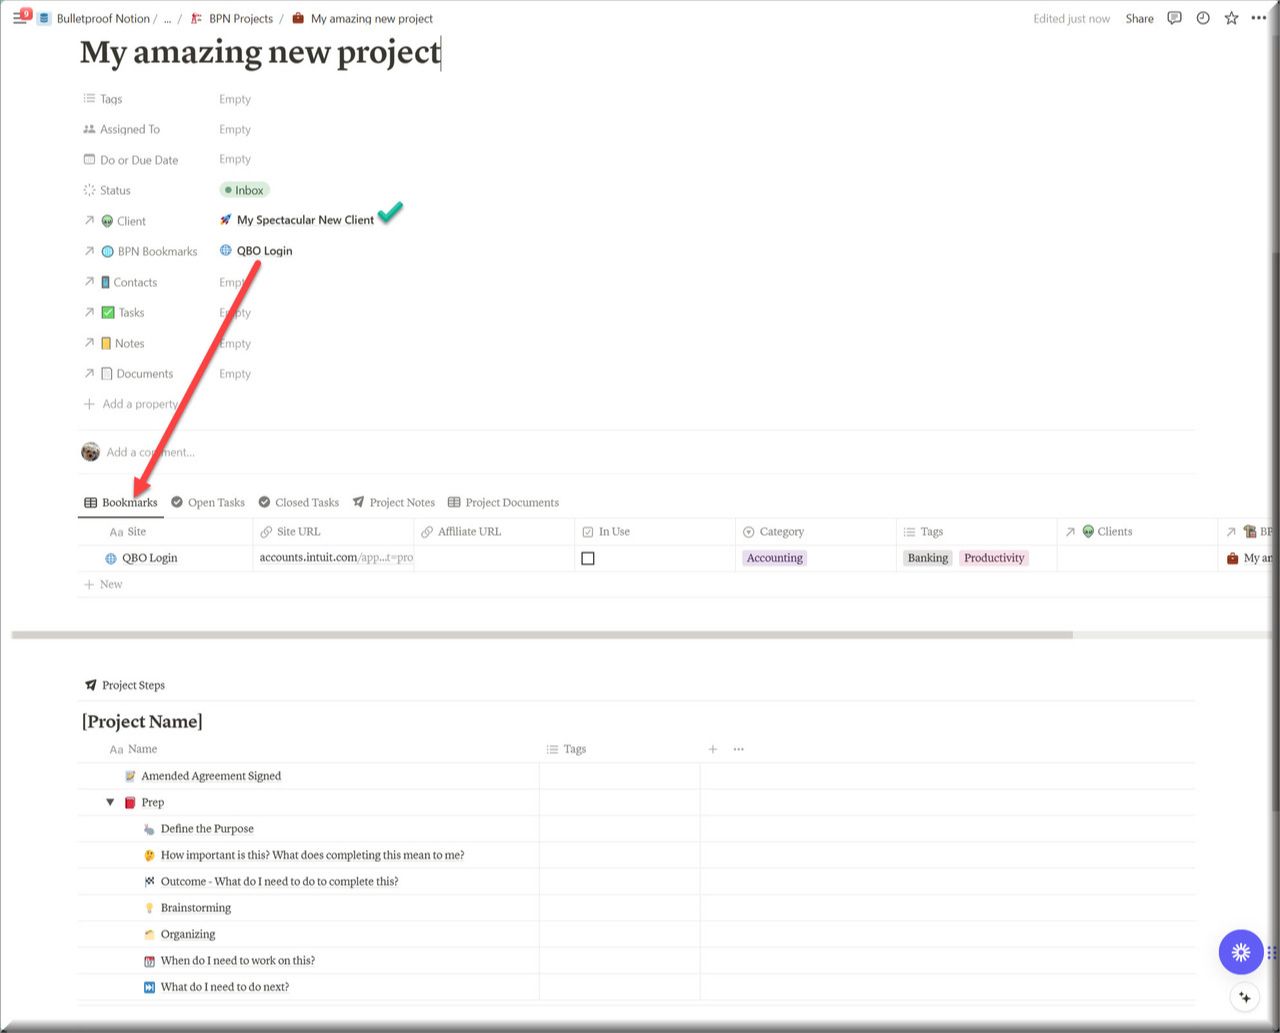
Make sure the client is assigned (don’t assume it will be).
Notice BPN Bookmarks at the top. If you know what you’re looking for you can “pull them in” by searching in there and selecting them. They will then appear in your bookmarks tab below.
The other way is to open your Firm’s global page (which should always be open in its own tab anyway) and browse your bookmarks to assign them to this project.
Everything else works the same. Add your tasks and notes to manage everything you need to capture, clarify, organize, reflect, and engage with in order to complete this project.
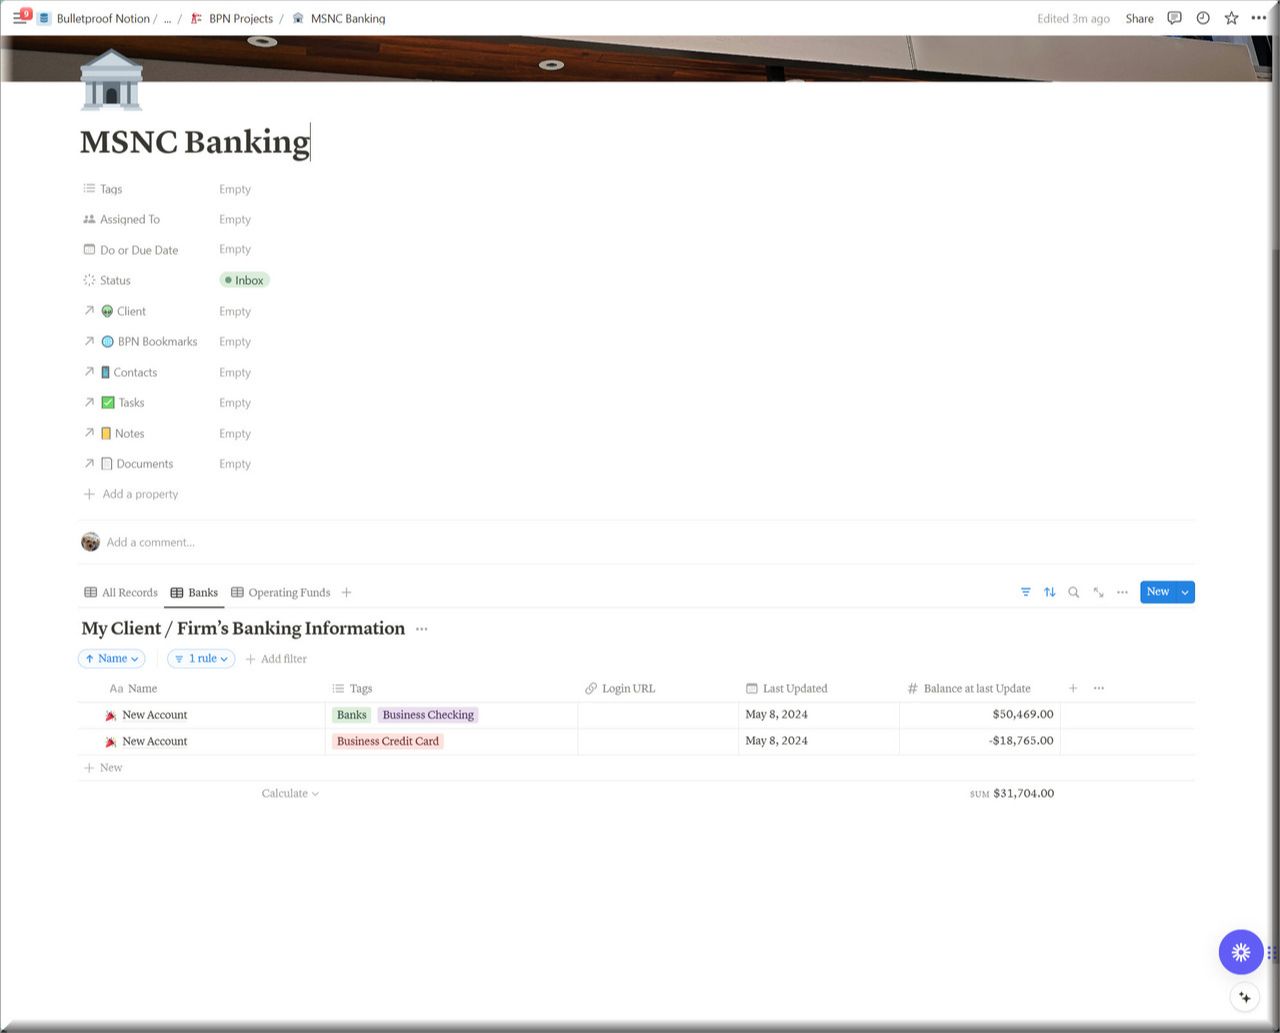
BPN Banking Template
This is a different kind of template. There are no tasks or notes per se. This is where you catalog each of your client’s bank and credit card accounts with their login URLs as well as any payment gateways and loan accounts. The idea is to completely inventory the client’s cash and all liens on that cash so each week you can update the balances and see as well as report to your client where they stand.
I started doing this for myself and I find it incredibly clarifying. It is a major component of how I flag for situations where I need to focus more (than normal) on increasing sales / doing something vs when I know I am ok.
All Records
The first tab is where you will list each account, tag it to indicate what category it falls in, and paste in the login URL. This makes it super quick and easy to get logged into all of the accounts at once.

I use Dashlane as a login management tool. It has an auto login feature so as I click each URL I am logged in, in seconds. This saves a lot of collective time.
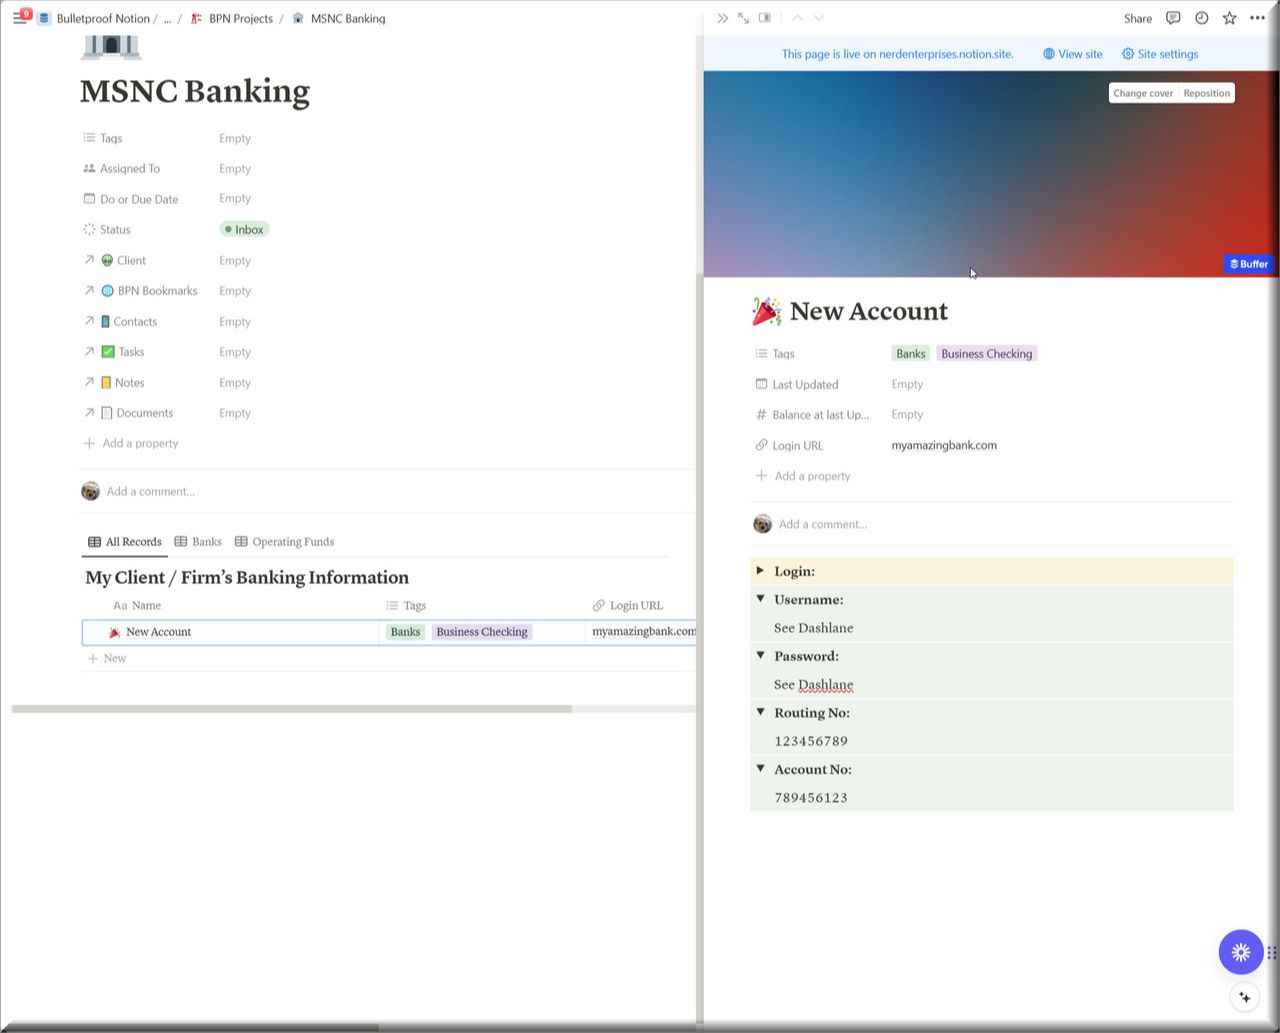
I wouldn’t put logins here in Notion, but I like putting the reminder that they are in Dashlane.
Having the routing and account number handy is super helpful. Note: this is information that appears at the bottom of any check they ever write. This is a lot more secure than a check that is out there circulating.
Banks
The second tab is where you will update the balances each week.
Anything that represents a lien on cash, like a credit card or loan balance gets entered as a negative number. Then your total at the bottom shows you your net cash position.
This view is filtered to show only “Banks” and Payment Gateways.
Operating Funds
This view is filtered to show only business bank accounts, cash, payment gateways and credit cards. This is a quick glance at what you have access to right now.
Weekly Snapshot
The default template in this database is for New Accounts, but if you peak into the templates there is one for a weekly Snapshot. This is where you can log the amounts each week and preserve the history before you update it next week.
You only need this template once for each client, unless you want to start clean for purposes of the “averages.”
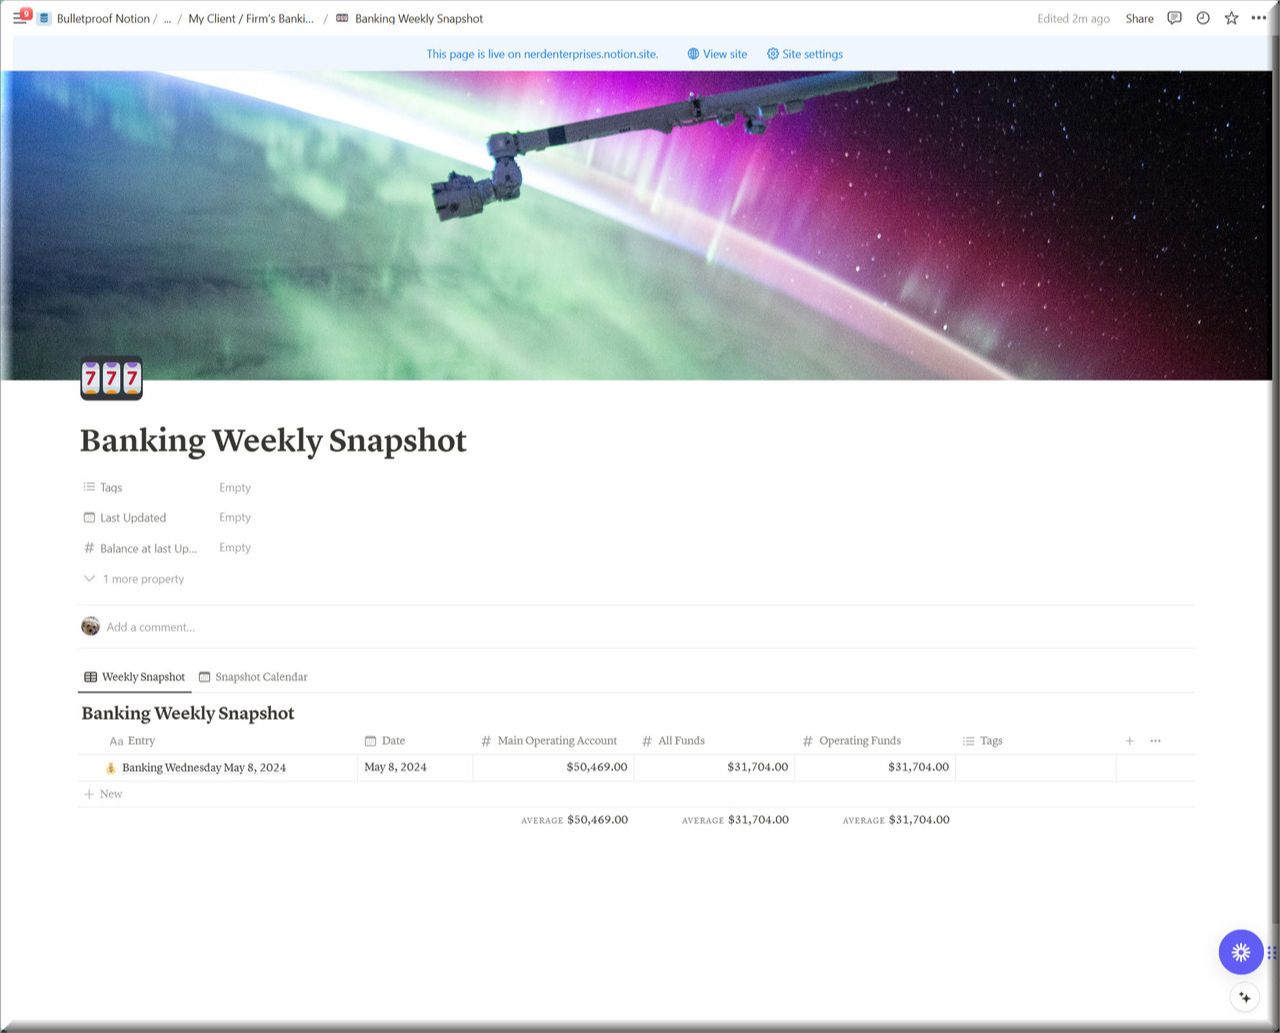
Naming these the way I am suggesting is similar in nature to why I have you name your daily journal entries the same way. It can be really useful to see what everything looked like (e.g.) for the past number of Wednesdays!
Then the date, while redundant, can be used in the ways that dates can be used, so it’s the same information, but it’s useful in a different way. For example, the Snapshot Calendar view that you see there is driven by that date.
Referral Source Template
Let’s say you work with a CPA firm who refers you to a lot of clients?
This template will allow you to set up that “referral source” as a project. So you would probably use this in your own firm, not in a Client.
Then each client they refer to you can be assigned to this project, or you can add them from within this project. That way in that project you have a list of all of their referrals. This will help you manage billing etc..
You can use this template for each referral source. It’s really just a way of grouping the list of clients that any referral source has sent you in one place.
That’s all for Project Templates!
As you get more comfortable with Notion, I am sure you will come up with ideas for other templates and when you do, I hope you will share them with us in Slack, and if others agree they would love to have that template (with your permission of course) I will add them to the master BPN Templates.
Who knows? Maybe we can build a marketplace where each of you can have a little side hustle with these templates by selling them.
UP NEXT: LESSON 8
How to Manage Your Contacts
See ya in the next lesson ;-)
© Copyright 2024 Nerd Enterprises, Inc. All rights reserved. Reproduction or duplication of this content without our express written consent is strictly prohibited.
