
Lesson 9: Databases - Create and Manage Linked Databases

Bulletproof Notion Work Management System
For Accountants and Bookkeepers
At this point I’ve taught you how to manage bookmarks, clients, tasks, notes, and projects.
Each of these lives in its own database in Notion.
Now it’s time to start learning how to leverage the power of these databases, and how you can use Linked Databases to aggregate information in a really useful way.
How To Work With Linked Databases
First I am going to show you how to work with the existing linked databases in the template. Then I will show you how to create your own linked databases.
In fact, this whole operating system is built on linked databases. Your source databases are all in the databases page, which is where and why I don’t want you to mess around in there.
If you change a view or even delete a linked database, your source data is still intact. Of course if you change the data, then that affects it everywhere.
I’m going to borrow a concept from one of our cohorts because this will give you a really clear picture of how you can put this template to powerful use.
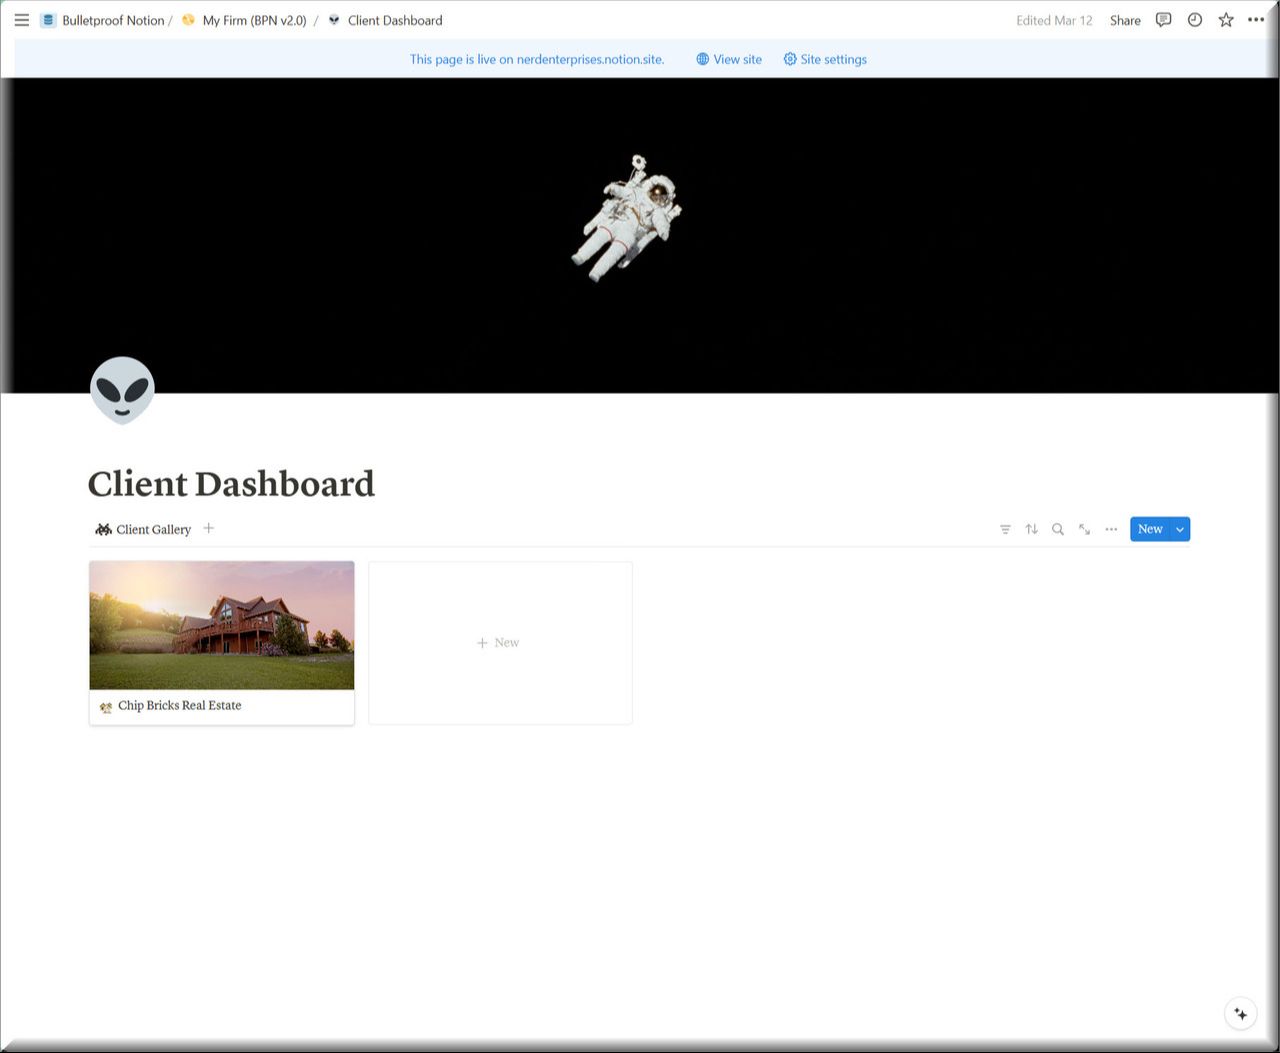
Let’s say you have a client who owns some real estate?
Now there are many things you have to track about these properties, and some of those things will be linked, like paying all of the property taxes which generally will all need to be paid at one time.
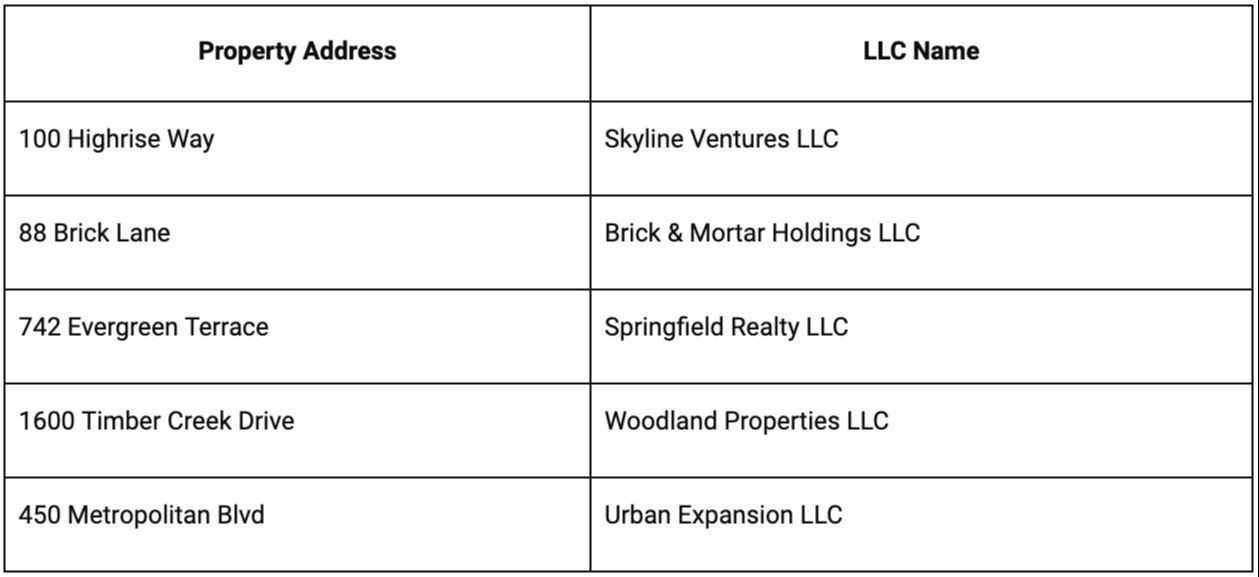
The client is Chip Bricks Real Estate.
Here are his properties:
I’ll set each of these properties up as a project to start with. I’ll use the Project Management - General template.
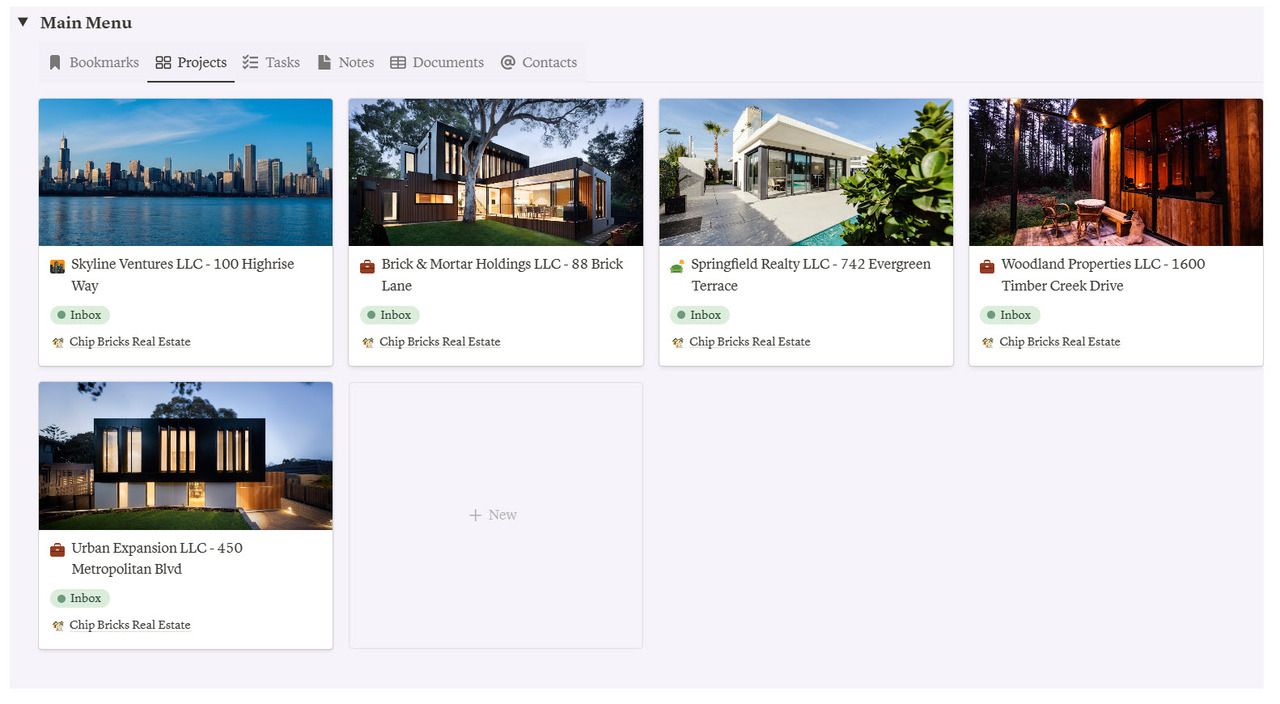
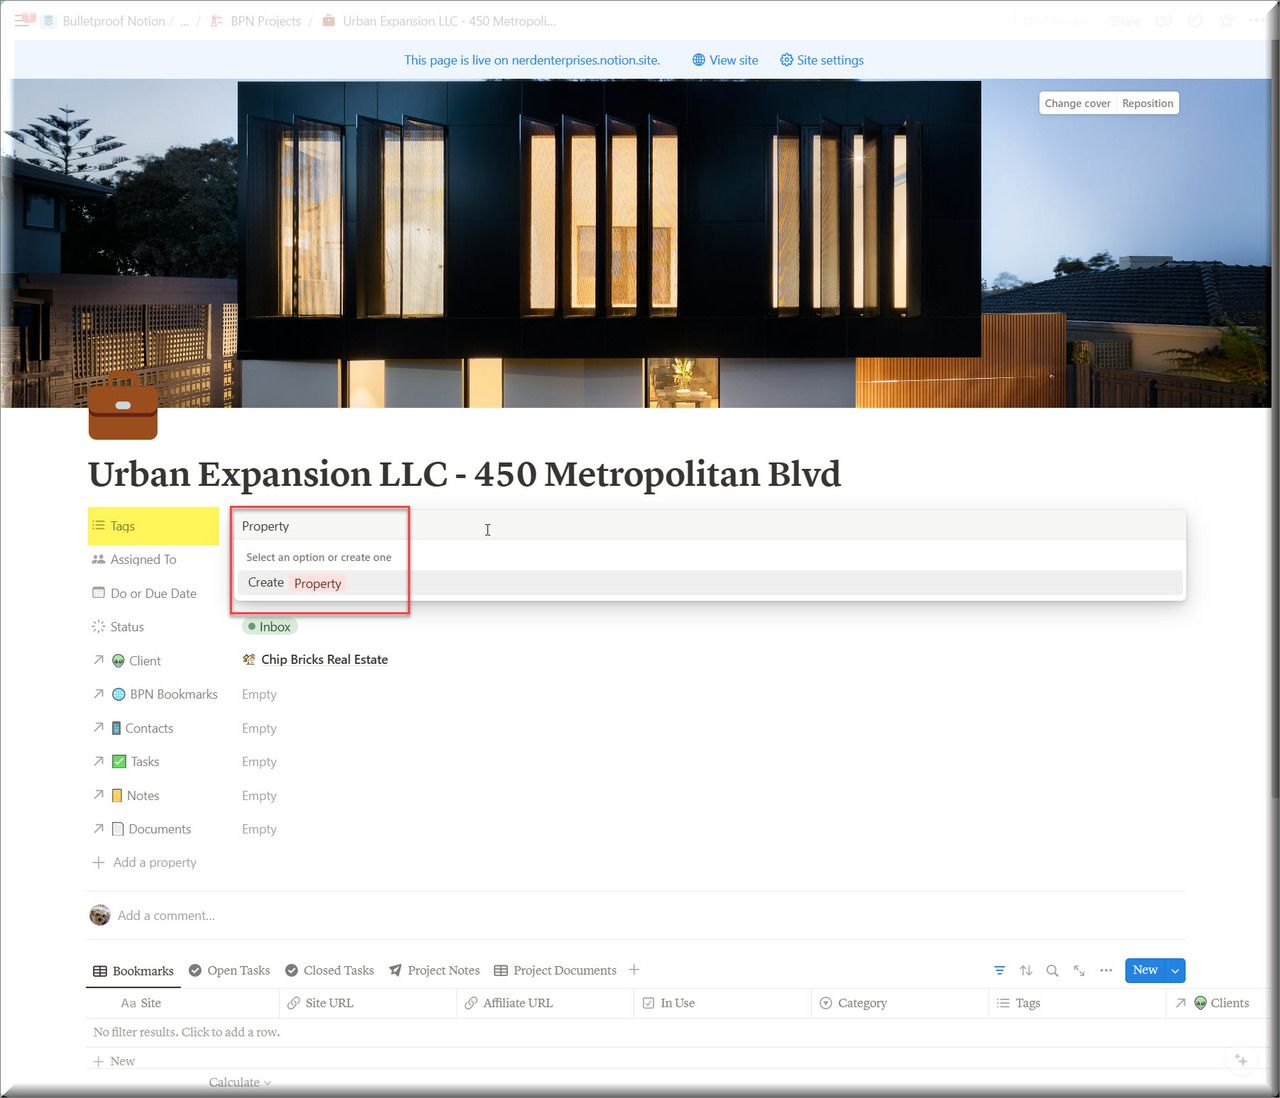
Another thing you might do here is add and assign a tag called, “Properties” to distinguish these from other kinds of projects you may work on for this client.
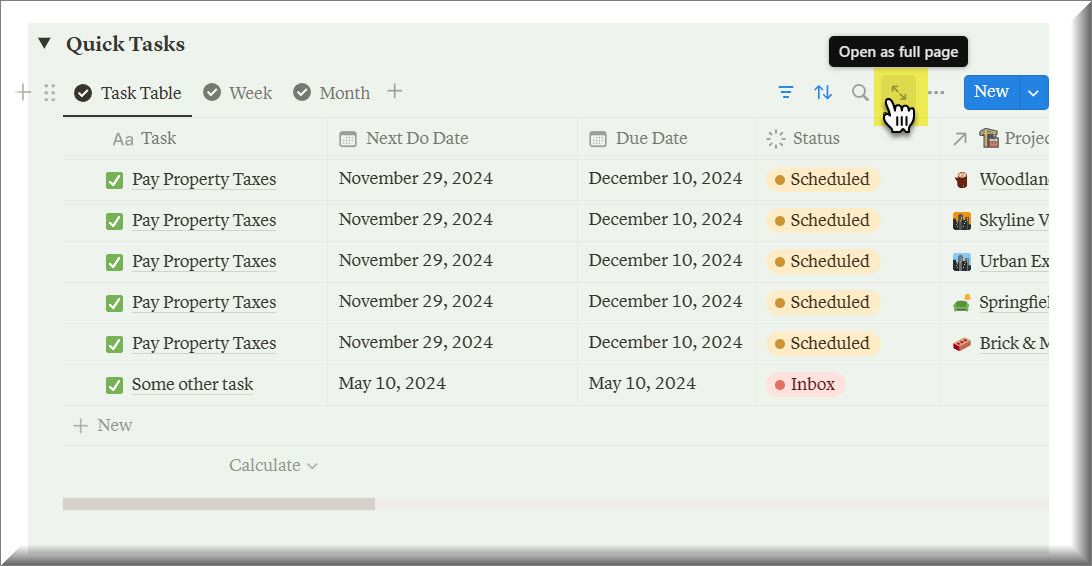
Next I will add a task to each project to pay the property taxes by Dec 10, 2024. But here’s how we’ll do it, since it is really the same task, we’ll need to copy it for each property.
Use the Quick Tasks view and create the task without assigning the Property (Project) at first.
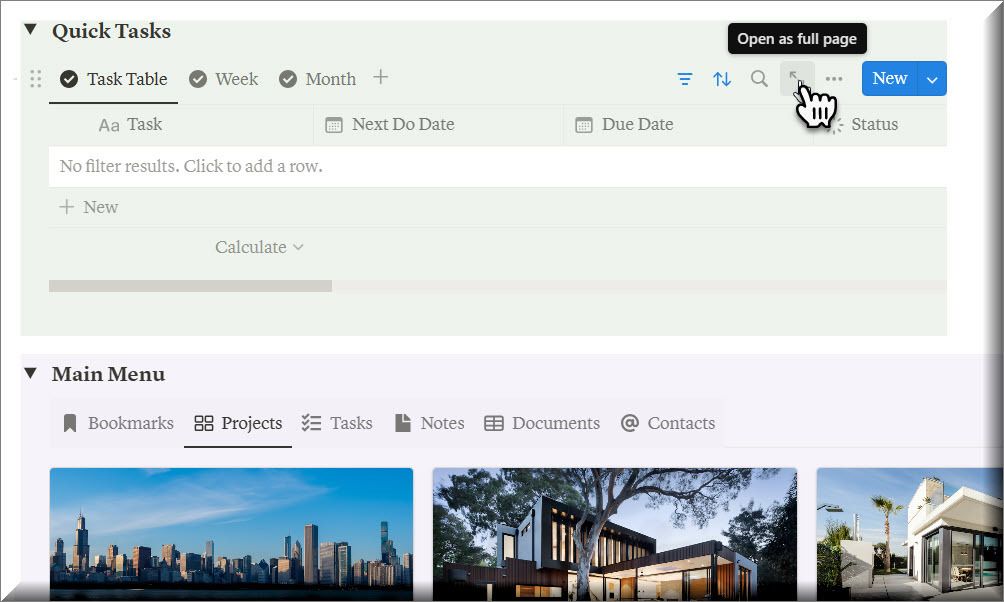
Set up the first task with the status, Scheduled, and the Do and Due dates.
Then duplicate it as many times as you need for each property.
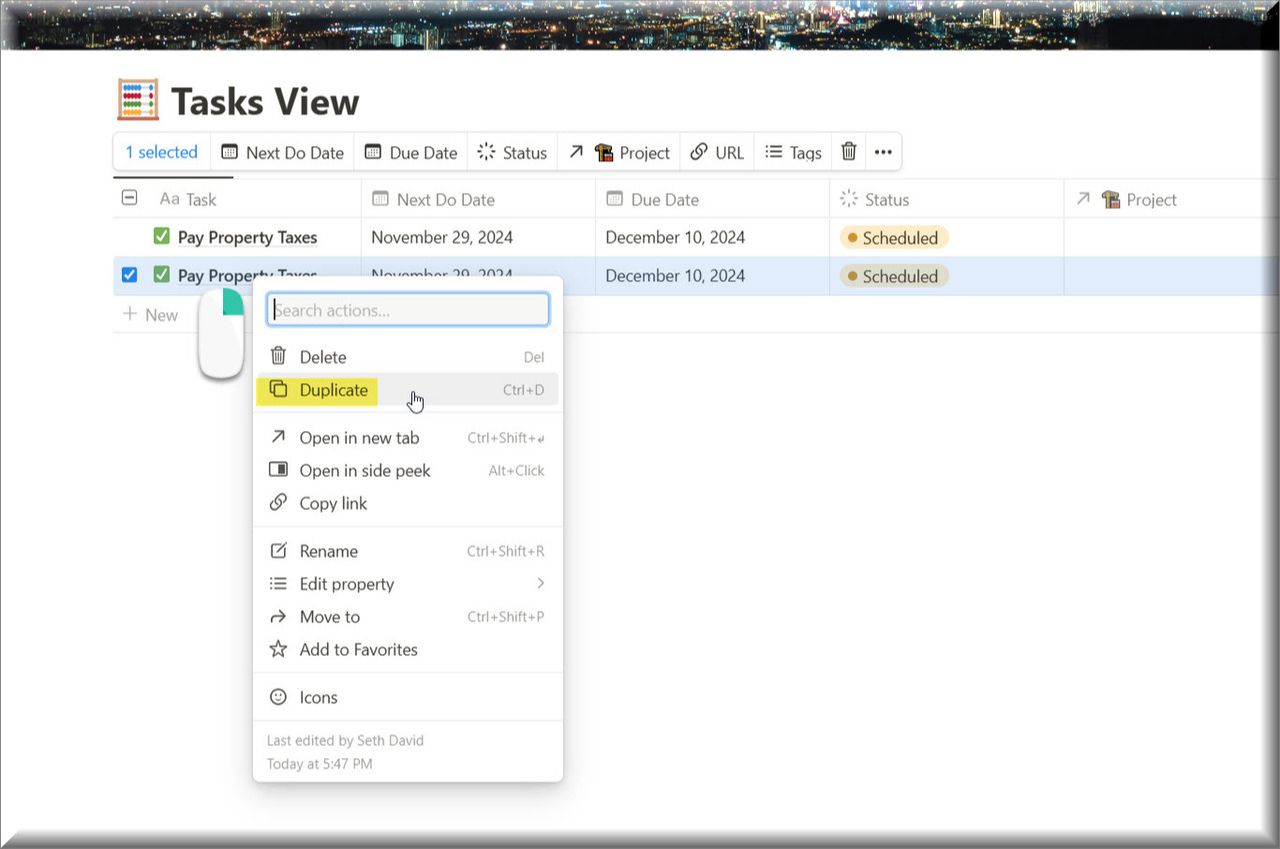
Then assign each to one of the properties.

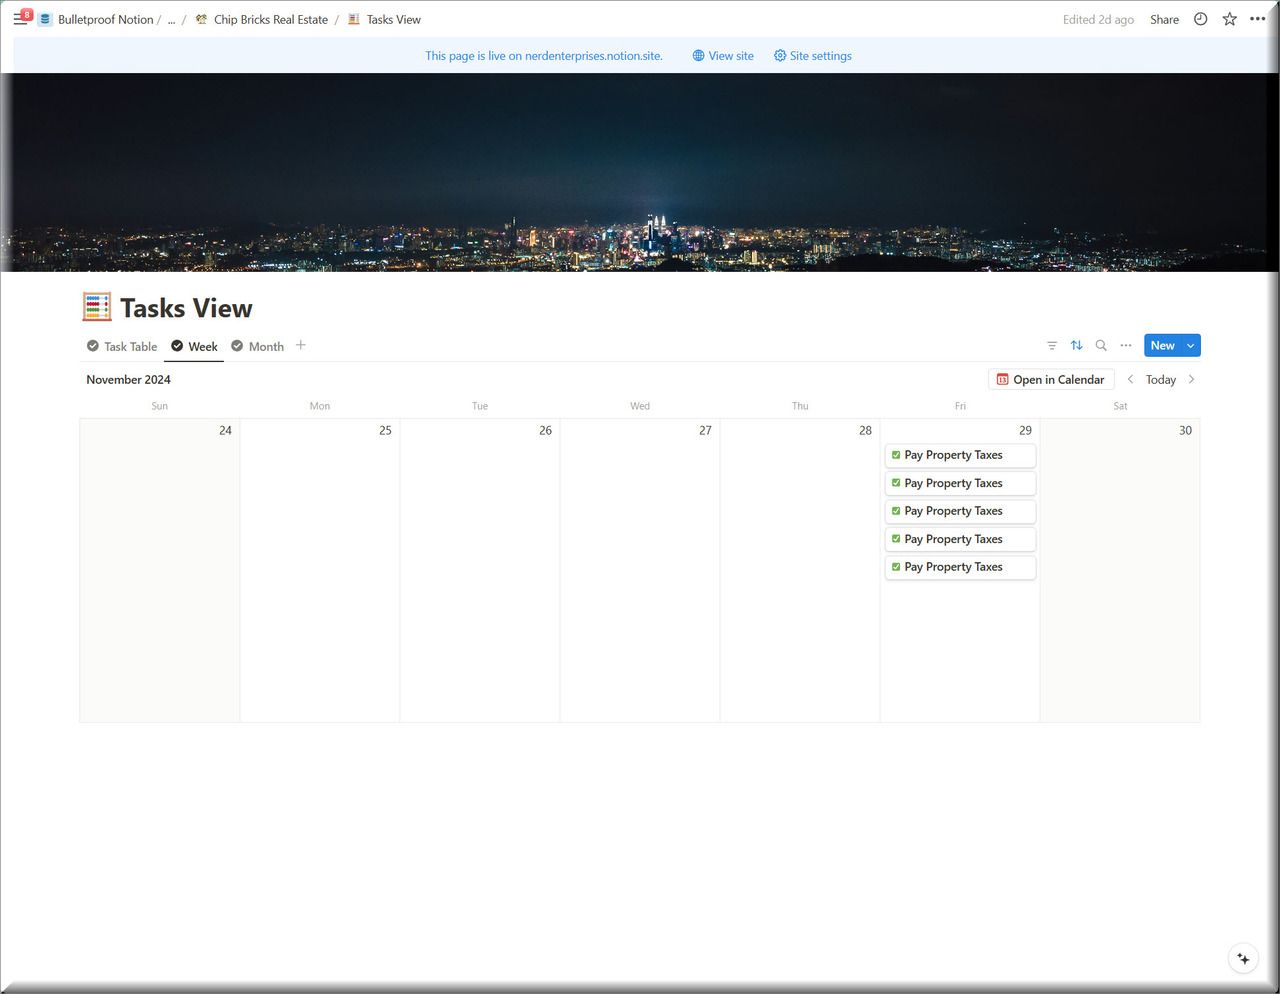
Now we’re ready to create a Linked Database that aggregates all of these tasks in one place.
Let’s create a project called, “Property Taxes.”
Then we’ll add this project to each of those tasks.
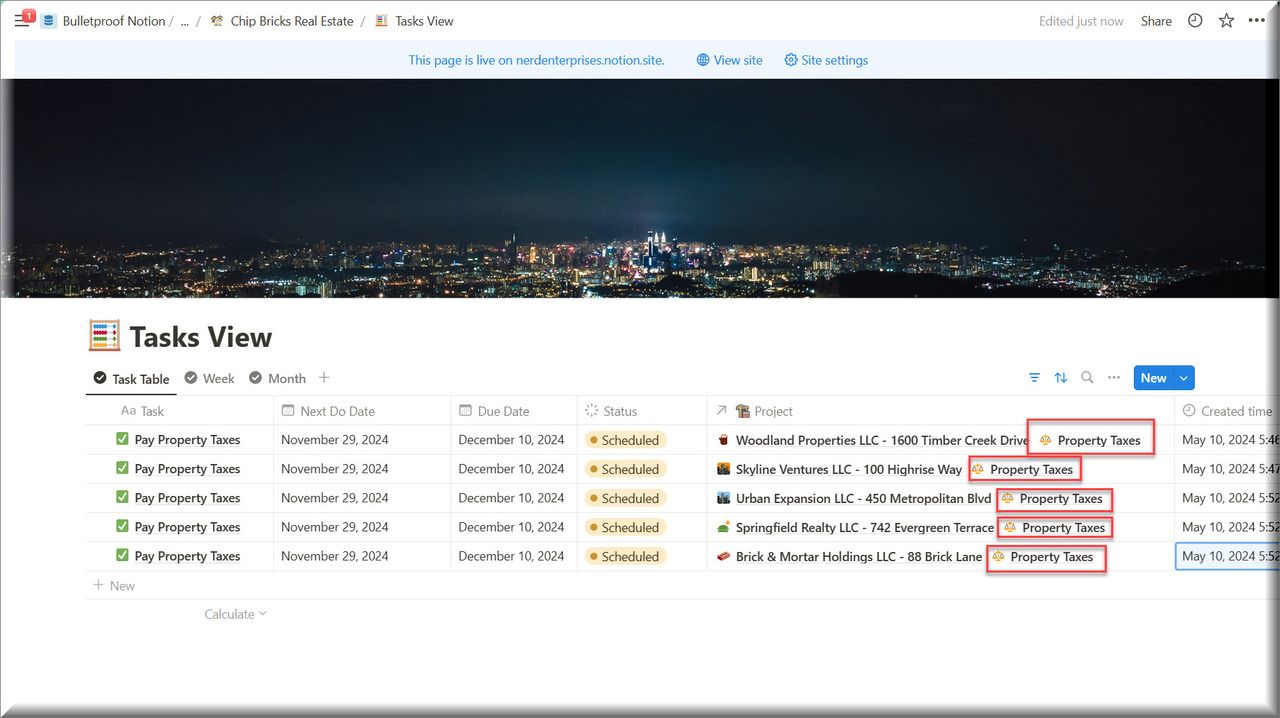
What we’ve done is created a common link among all of these tasks with the Property Taxes Project. This is the key. Now we can use that in a filter to link ONLY these tasks inside that project. So when the day to pay the taxes comes, you can access all of them from one place.
Since you are using the Project Management - General Template, it is already configured with linked databases for Bookmarks, Tasks, Notes and Documents.
If you click on the Open Tasks tab, you will see all of your tasks there.
If you add a new task here, it will automatically get assigned to this Property Taxes Project.
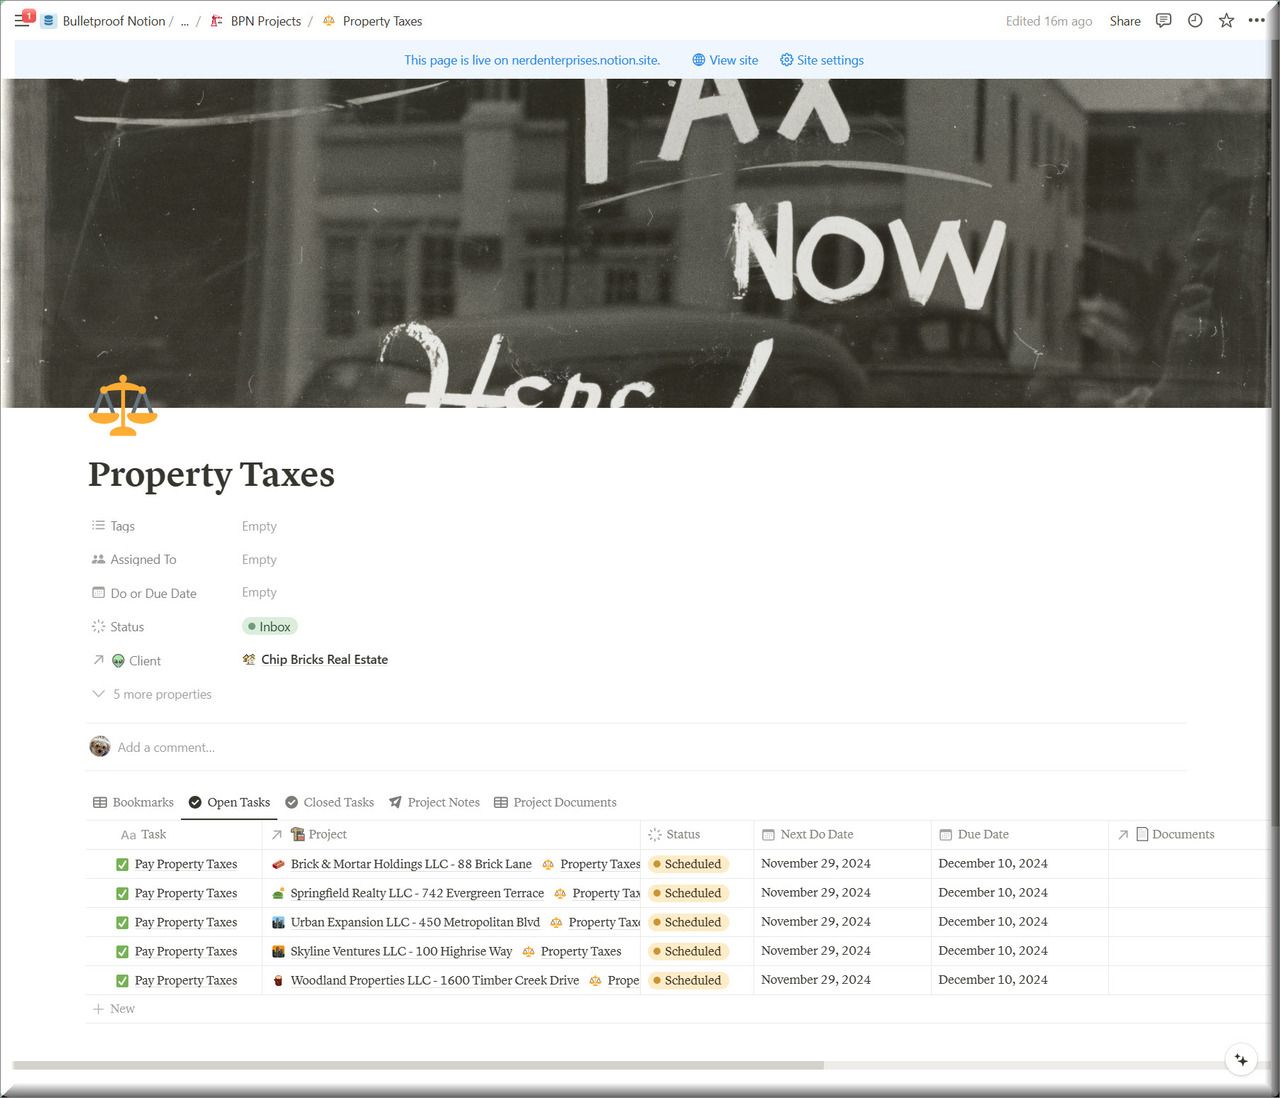
Of course you’ll find these tasks in the master task list. The point of this is to group them together logically, so you can focus on them all at once when you need to.
Presumably you will have the information you need to quickly get these taxes paid inside of each task.
Bookmarks
Let’s go back to Bookmarks now.
Right now you have your main Bookmarks list in your global firm view, and then each client has a list linked to the same source database and filtered for just the ones you’ve assigned that client.
Then your project management templates have one that is filtered for those that are assigned to that project.
The point is that each of these views are limited, because they live in tables with other linked databases, so you have limited context for creating views that carve up your bookmarks based on things you might want to filter for.
First I set up some sample bookmarks for you in this database:
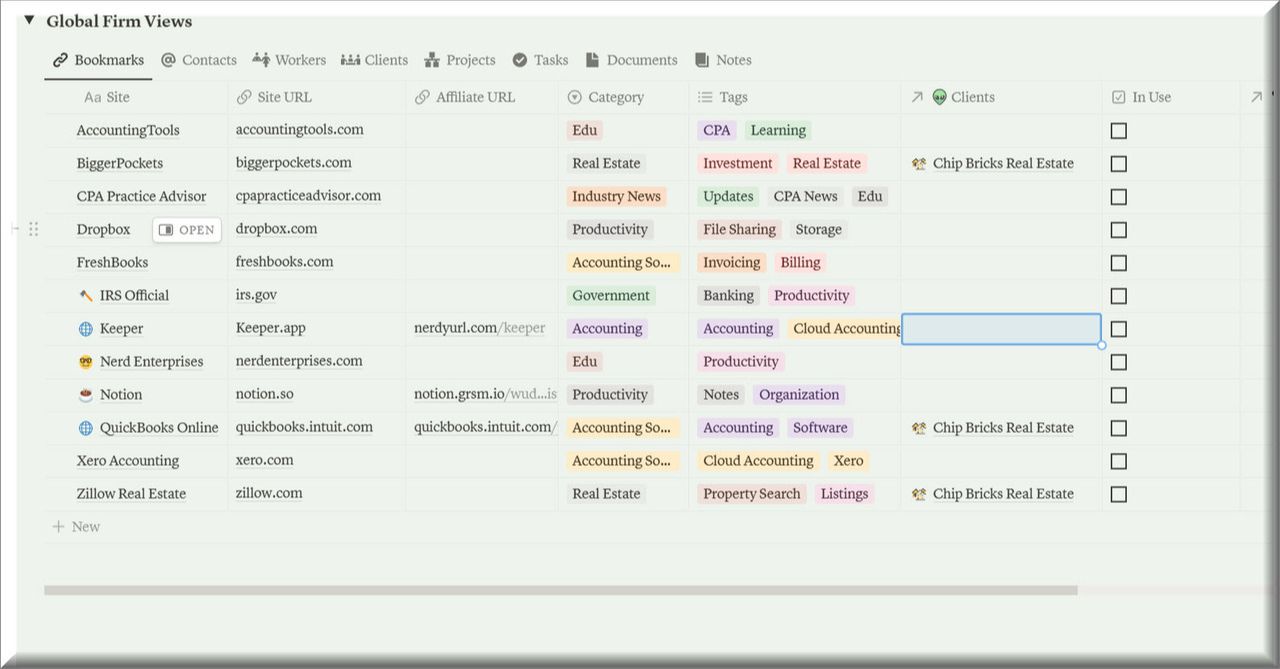
The few that I’ve assigned to Chip Bricks Real Estate will now show up in that client’s portal.
Notice I’ve got a few affiliates in there.
So let’s say I wanted to create a note with just my Affiliate links? This way when someone reaches out to me and asks for any of them, I can reference this note, and even send them the note’s link to share with them. Then they can bookmark this for access to all of your affiliate links, and anytime you update or add one in your master Bookmarks database, this note will have the most up to date information too.
Now THIS is what Optimized for retrieval means.
Let’s create a firm level note (no client assigned) with a linked database where the data source is your bookmarks database, and then we filter it for anything with an affiliate link.
Use an Empty note (don’t use a template) for this.
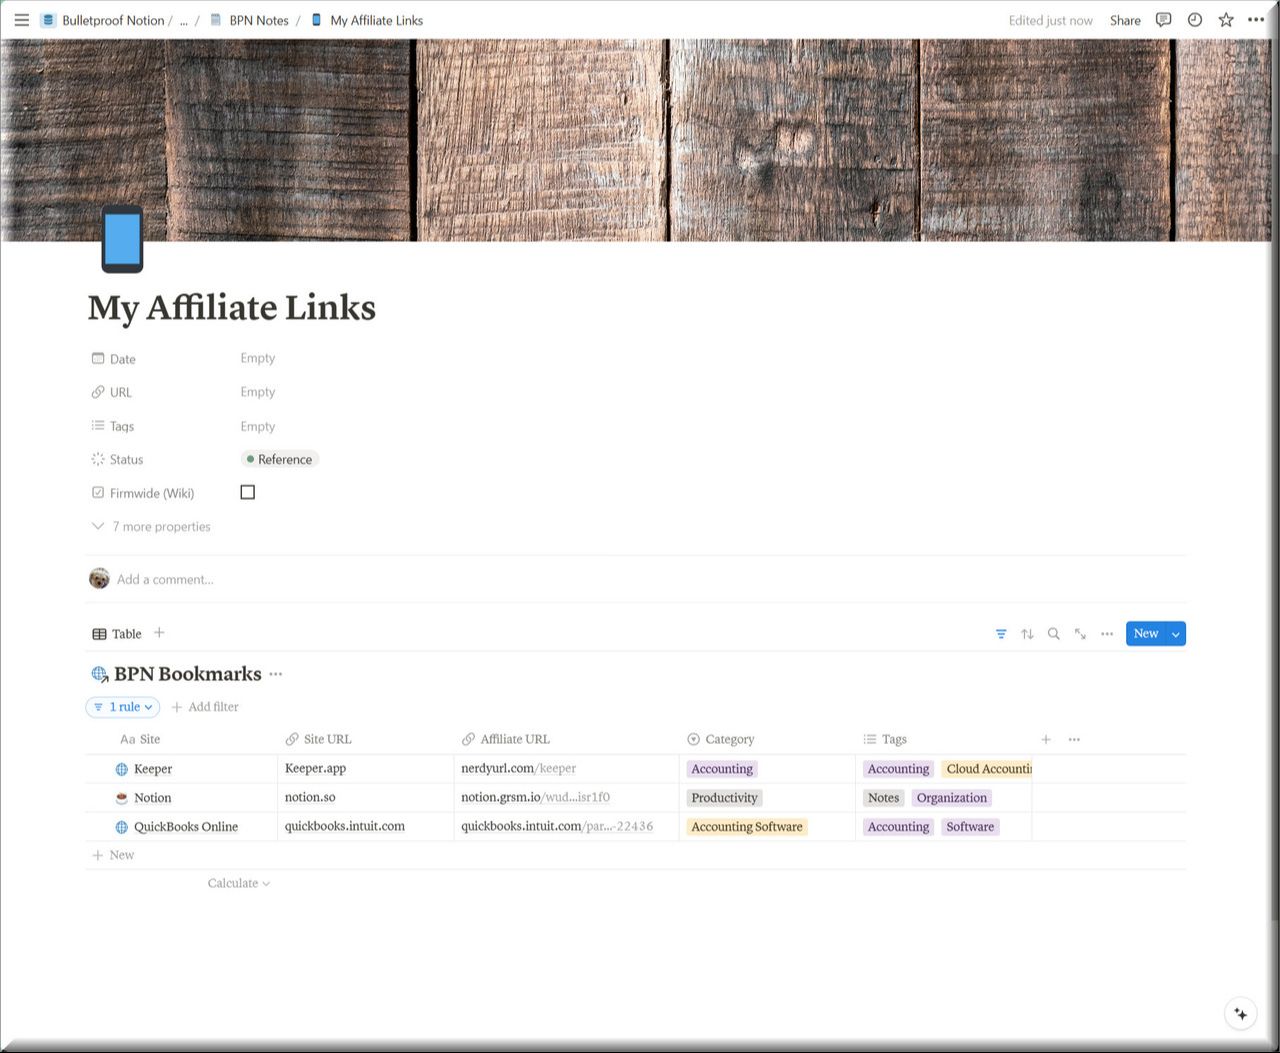
Call it “My Affiliate Links” or whatever works for you.
On the first blank line type “/Linked Database”
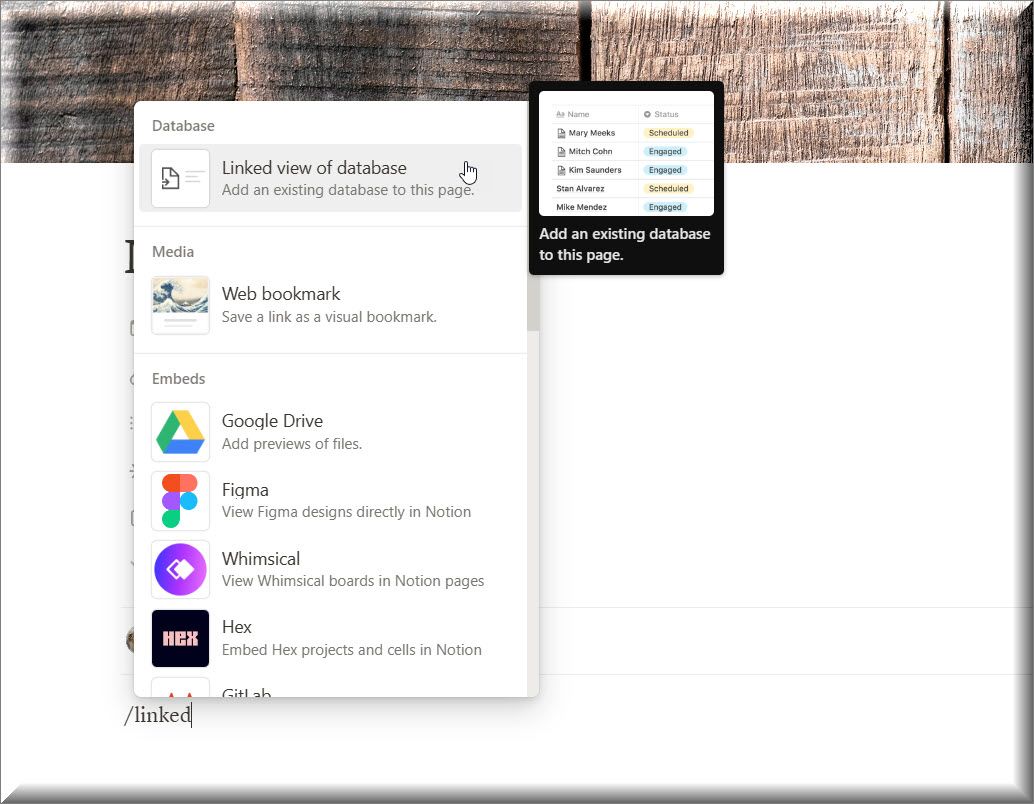
Then choose your bookmarks database as the source and confirm the existing view.

Initially you will be looking at the whole list, but this is a distinct view that doesn’t affect any other view, so now all you have to do is filter it for anything that has an affiliate link in it.
Click the Filter icon and choose Affiliate URL.

Then change the filter option to “Is Not Empty” and then add this to an advanced filter.

It is a general best practice to always use Advanced Filters. One of the main reasons is that when you share a page like this, the end user will not be able to see and access an advanced filter. They can filter their own view further if they want, but that will not affect you, and most importantly this means they can ONLY see what you’ve shared, nothing more.
Now anytime someone asks you for an affiliate link, share this page with them and ask them to bookmark it. But even if they don’t, the next time they ask you for it, you’ll have it for them in less than 10 seconds because this is optimized for retrieval!
You will also notice that I added a Status for “Reference” information.
If you don’t have this in your template, you can easily add it by editing the field and adding the option.
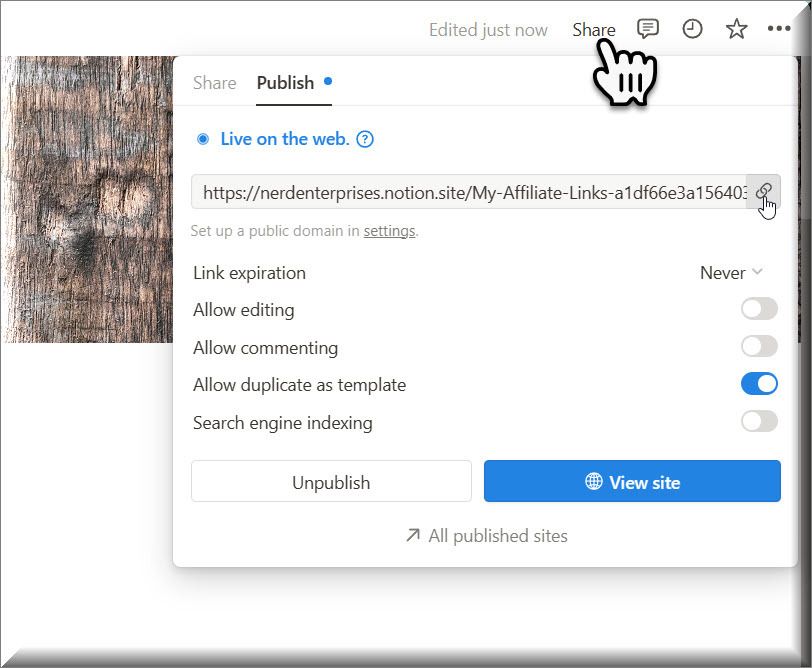
Next you can get the Share Link so you can send this to others.
Clients
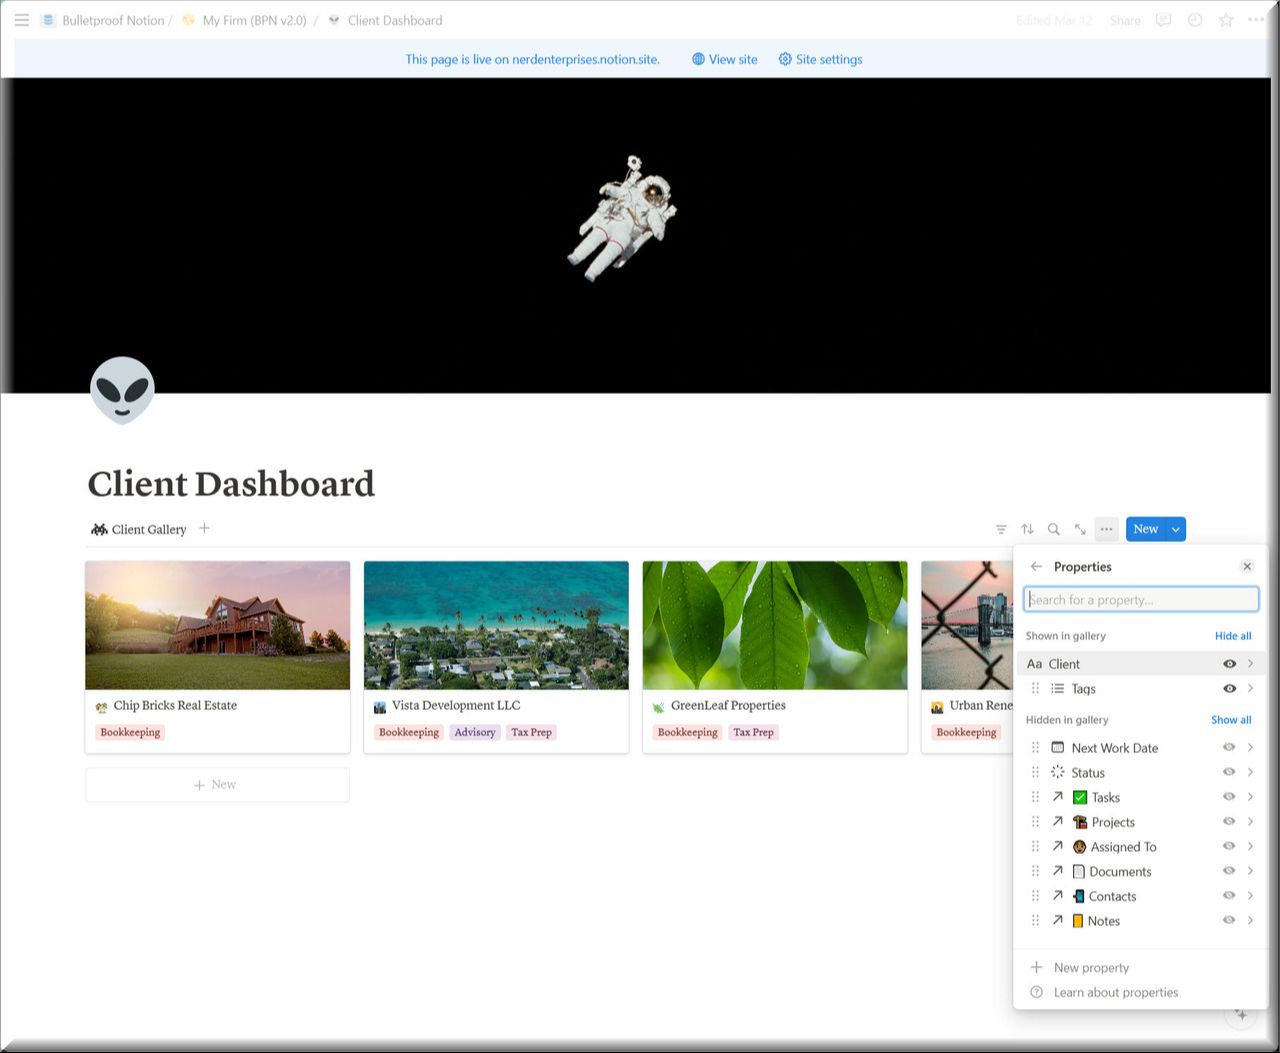
Let’s say you have different kinds of clients you service?
In fact, let’s say you have Bookkeeping, Advisory, and Tax Prep Services.
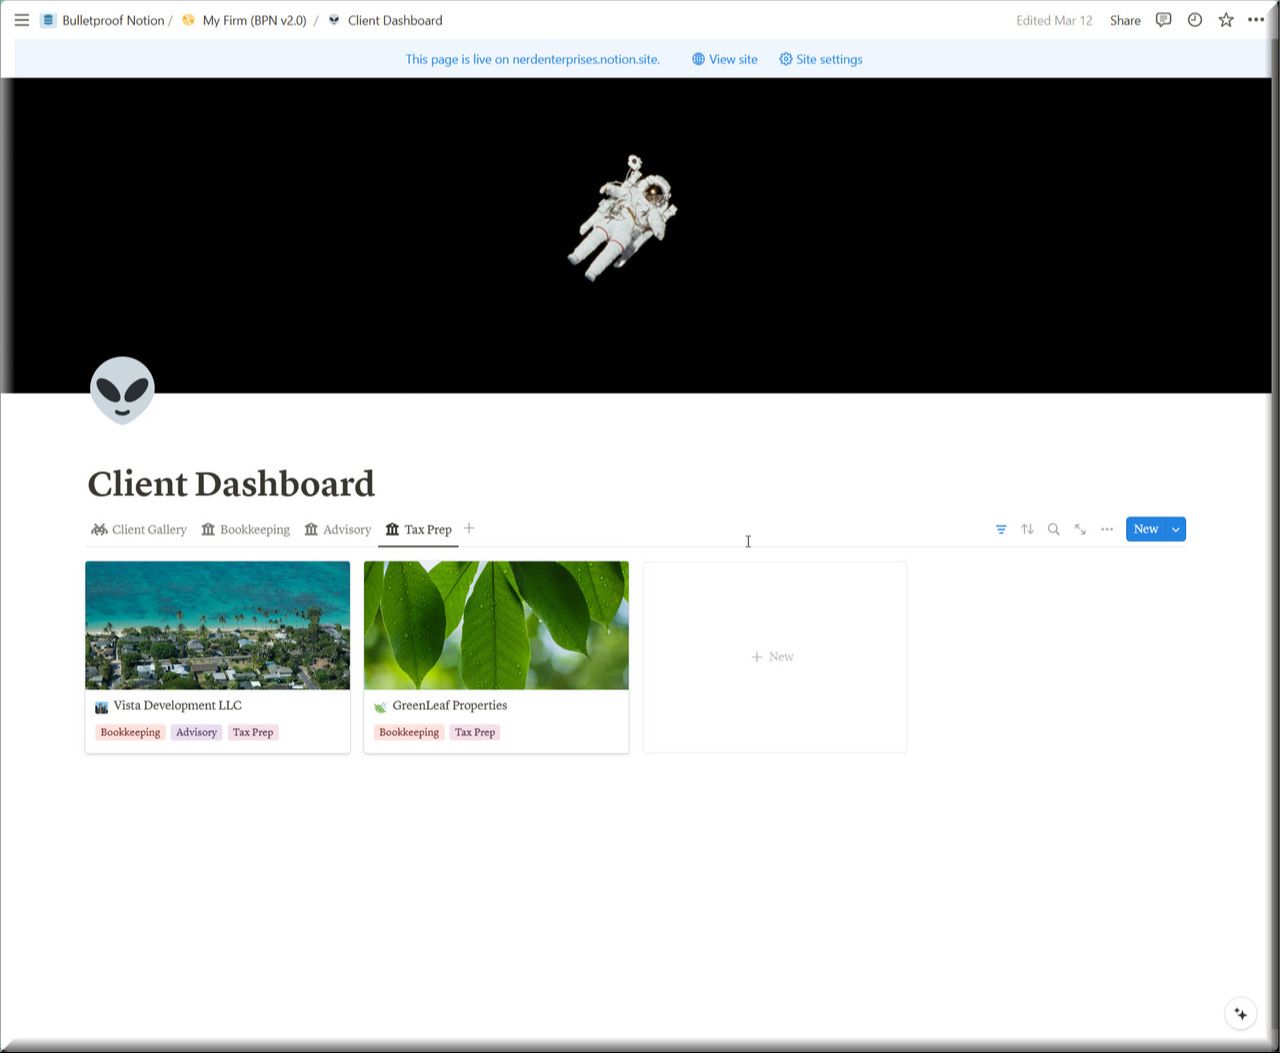
I’m going to use the existing Linked Database in your Clients Quick Access Dashboard for this.

This view is designed to give you a nice visual layout of your clients.
Over time as you add on many clients you may want to group them based on Bookkeeping clients vs tax prep etc…
I am going to add a few new sample clients here and tag some with one, and others with two or more of these tags, so we can build the views right into this Linked Database.
I also edited the layout to include the tags so you can see them right on the cards in the gallery.
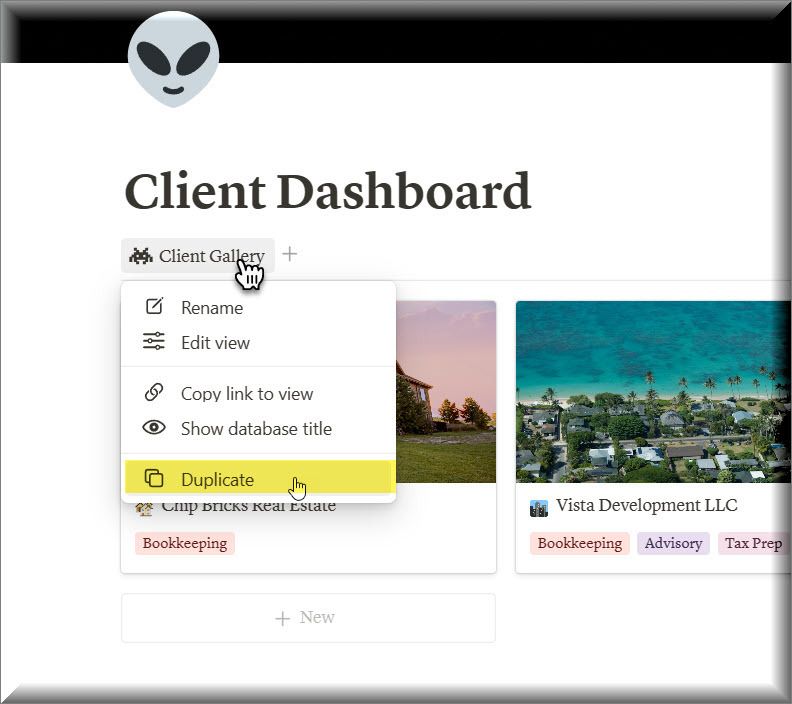
Let’s create a view that focuses on each of these services. See the little “Client Gallery” tab at the top of the gallery?
We’re going to click on that.
Choose Duplicate.
Rename it to bookkeeping services.
Then filter it for that based on the tag.
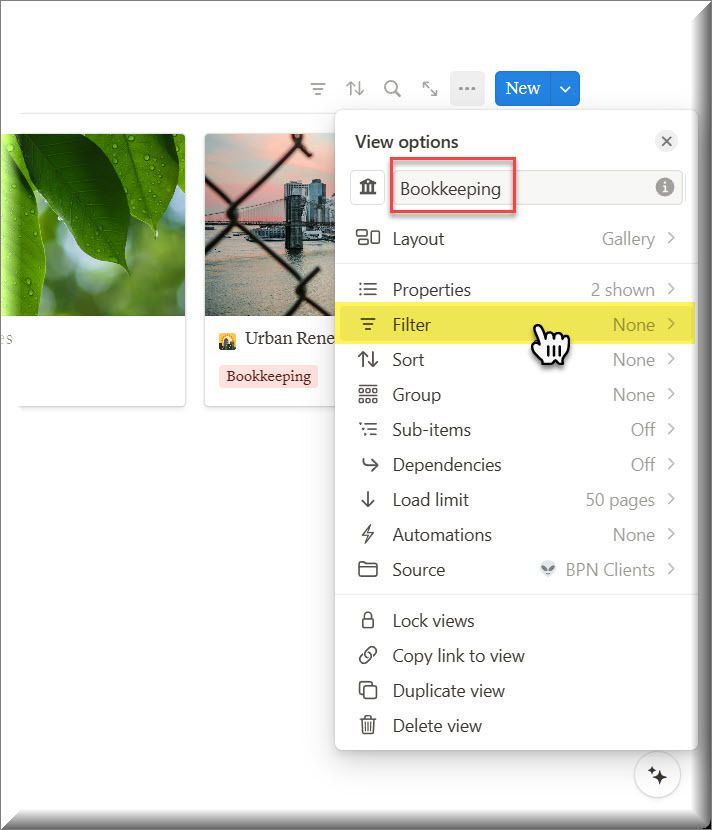
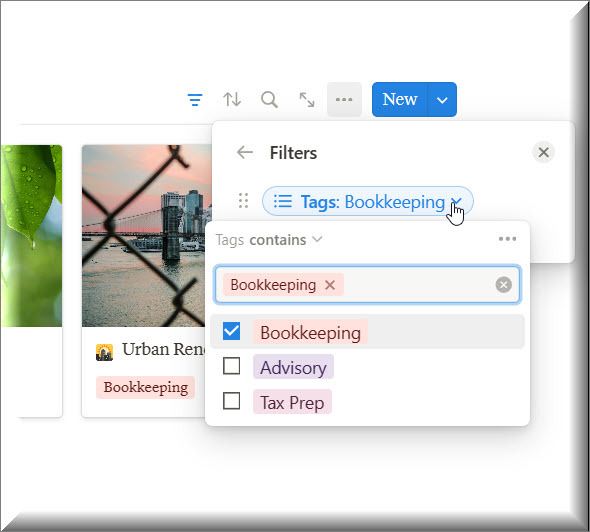
Once you’ve done the first one, all you have to do is duplicate THAT one and update the filter.
Repeat for each view.
Contacts
You already have a linked database set up for your contacts, where you have plenty of space to add more views so you can divide your contacts up in any number of groups as you see fit.
By default you have All Contacts, Super Friends, Prospects, and Clients.
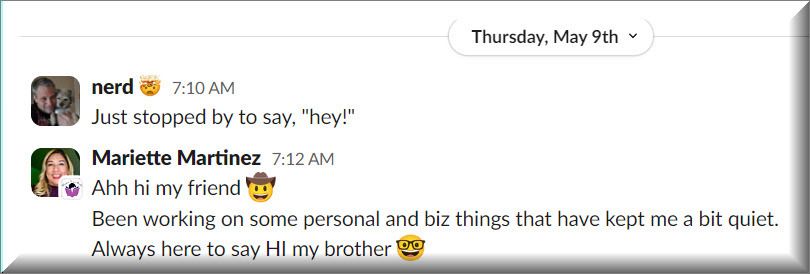
Super Friends are the people you do or want to be in touch with daily. This should be a short list, and the idea is to hop in here daily and see whom you want to reach out to, even if just to say, “Hey!”
If you study the filters on each of these views, you will quickly learn how they are configured, and you can certainly edit them all you want to suit your own desires.
To be honest I hardly use these views. I generally access my contacts in my global view and use the search to quickly pull up whom I am looking for.
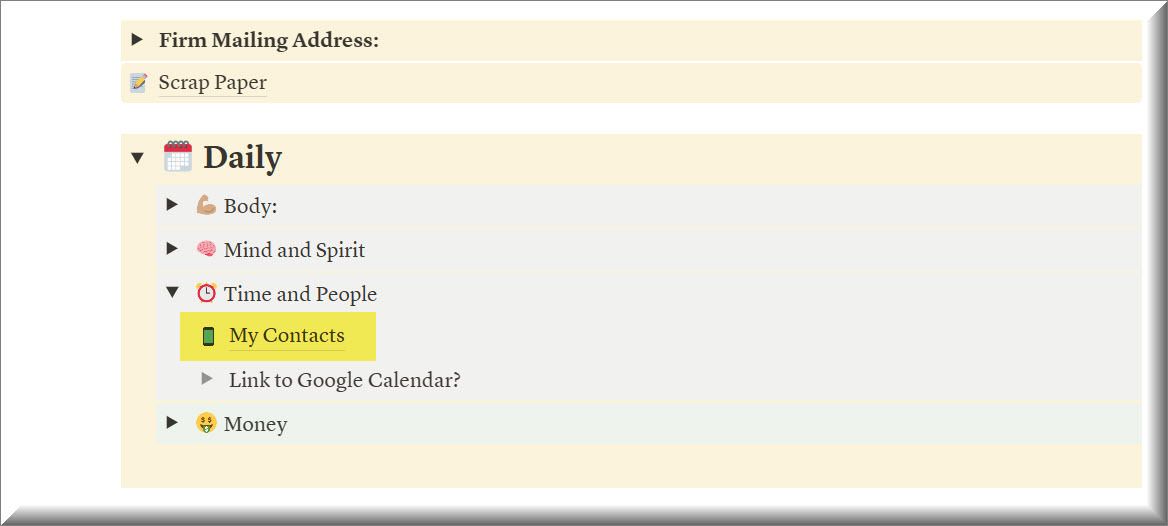
You will also find access to this same view under Daily, and then Time and People:
Projects
I’ve given you a nice gallery view of projects at the global level and in each client’s Main Menu, but let’s say you wanted a way to focus on projects and create more views. This will be especially useful if you have lots of different types of projects and you want to carve up views based on that.
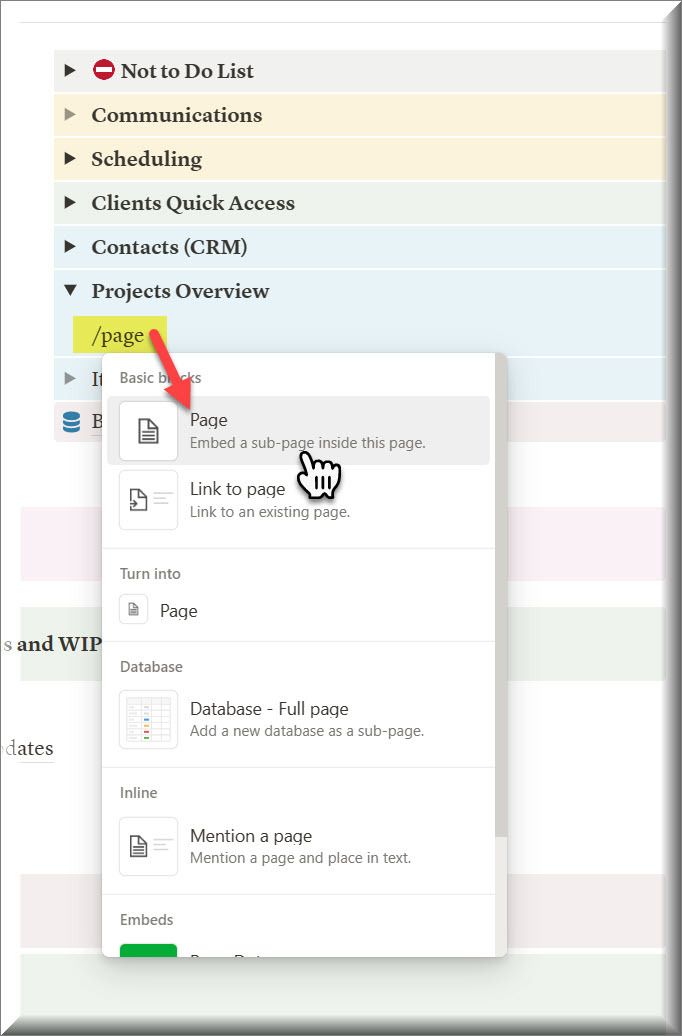
Let’s use one of your Quick Access toggles at the top right of your home page to create a new “sub-page” for this.
I showed you how to do this in a Note for Bookmarks. This is another way you can host a linked Database.
Rename the toggle to something like Projects Overview.
Then inside that toggle type /Page and continue through to create a sub-page.
Then name it, set an icon and a cover image.
Configure your page settings (e.g. Full Width etc…)
Then in the body type /linked… (that should be enough to get the option for a Linked Database. This works exactly the same as it did for bookmarks. We’re just doing it on a new page instead of a note (which is actually just another page in Notion defined to be a note).
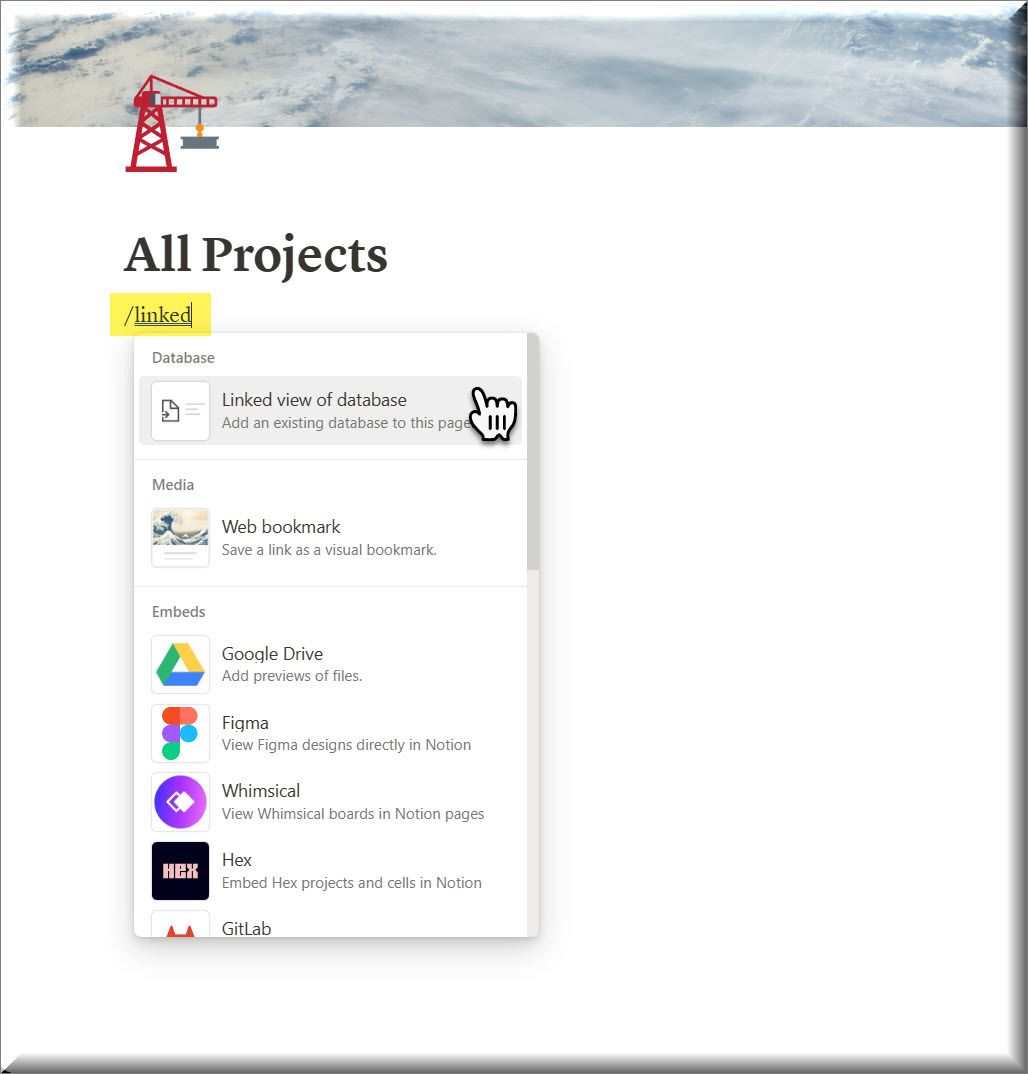
Then make sure you choose the RIGHT data source:

Next Notion will ask you if you want to pull from an existing view from the source.
Do it. This saves time.
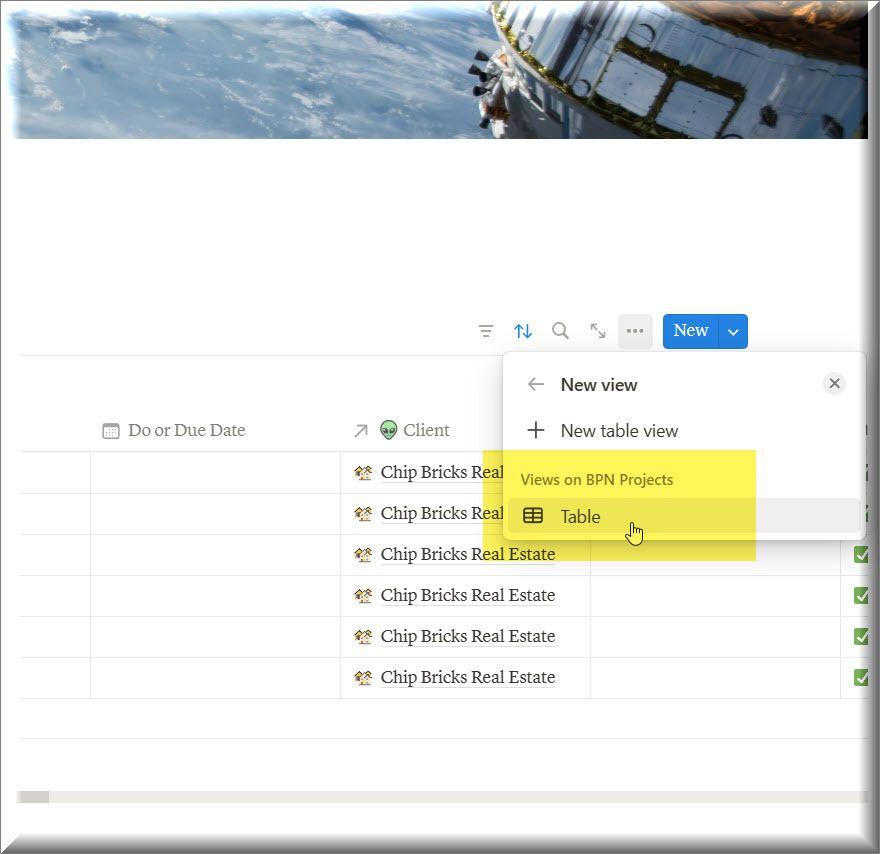
Now you can tweak this view’s settings without impacting the source, and add as many other views as you want.
Explore the layouts.
Play!
This is how you learn so you can truly OWN this!
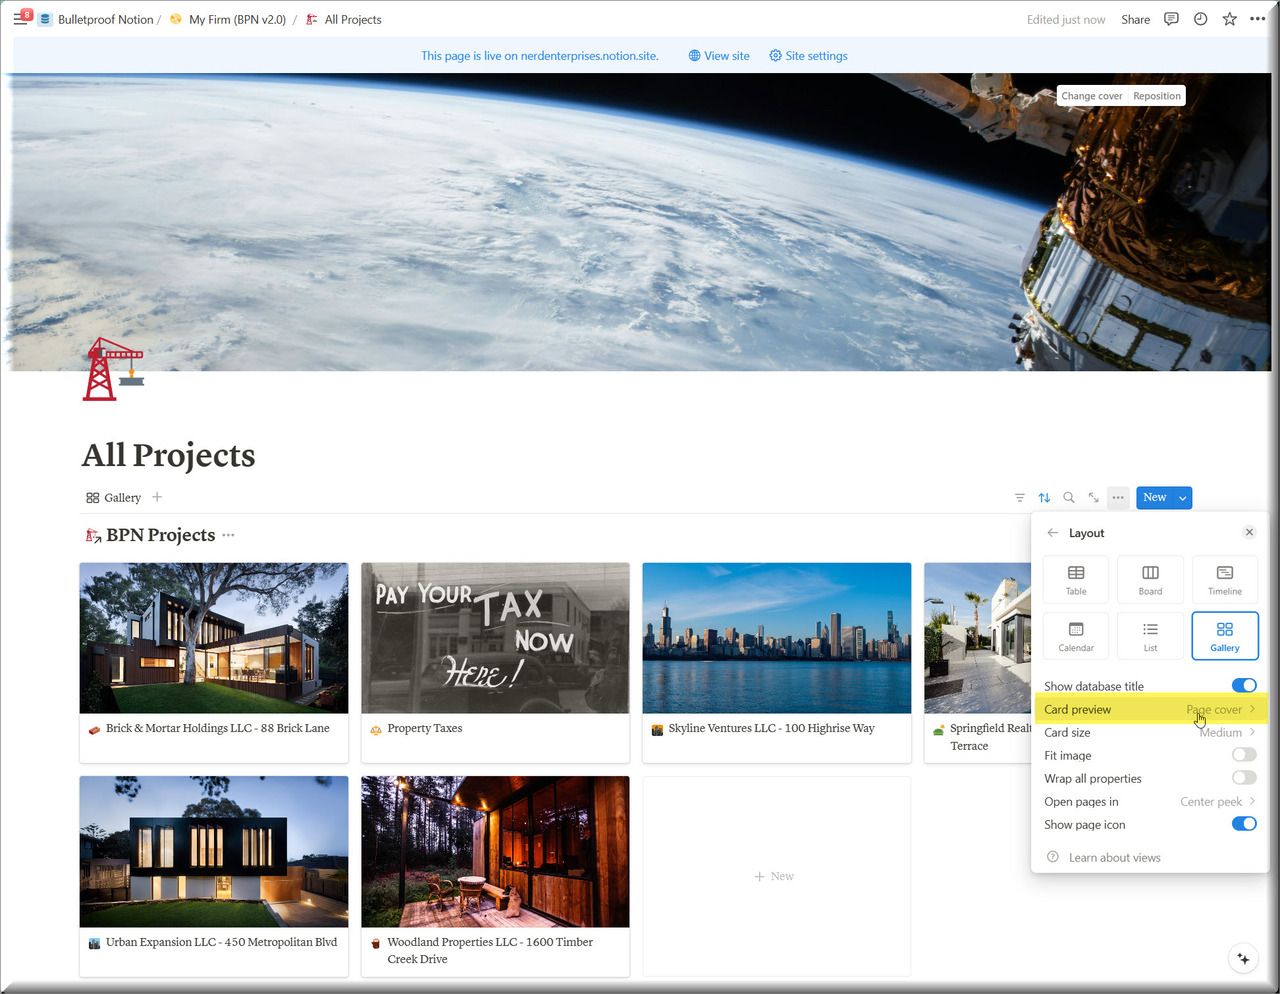
I like the Gallery View because it’s visual which to me is very fitting for projects, but you have to take the time to configure it with relevant cover images, and configure the view itself to use the cover as the preview image. This is NOT the default.
Tasks
For tasks you already have a focused “Global Task Views” section at the very bottom of your home page. And within any given client, you can expand the Quick Tasks view to get a focused view where you can add more views based on how you want to carve up the data.
Add all the views you like here based on any logic that works for you:
Documents
What I like to do for documents is create a project with a linked database. Then within that project I can carve up all the views I need for that project.
In fact I did this to carve up a view specifically for my 2023 taxes and my CPA seems to love it. When he asks for anything new I just add the document in, make sure it has the right tags on it, and poof! Like magic it shows up in the view I’ve shared with them which is in a project called, “Nerd Enterprises, Inc. 2023 Tax Prep (Seth & Shahnaz Personal)”
They of course like to do the bus and personal at the same time.
Here’s what it looks like (make sure you click for a closer look):
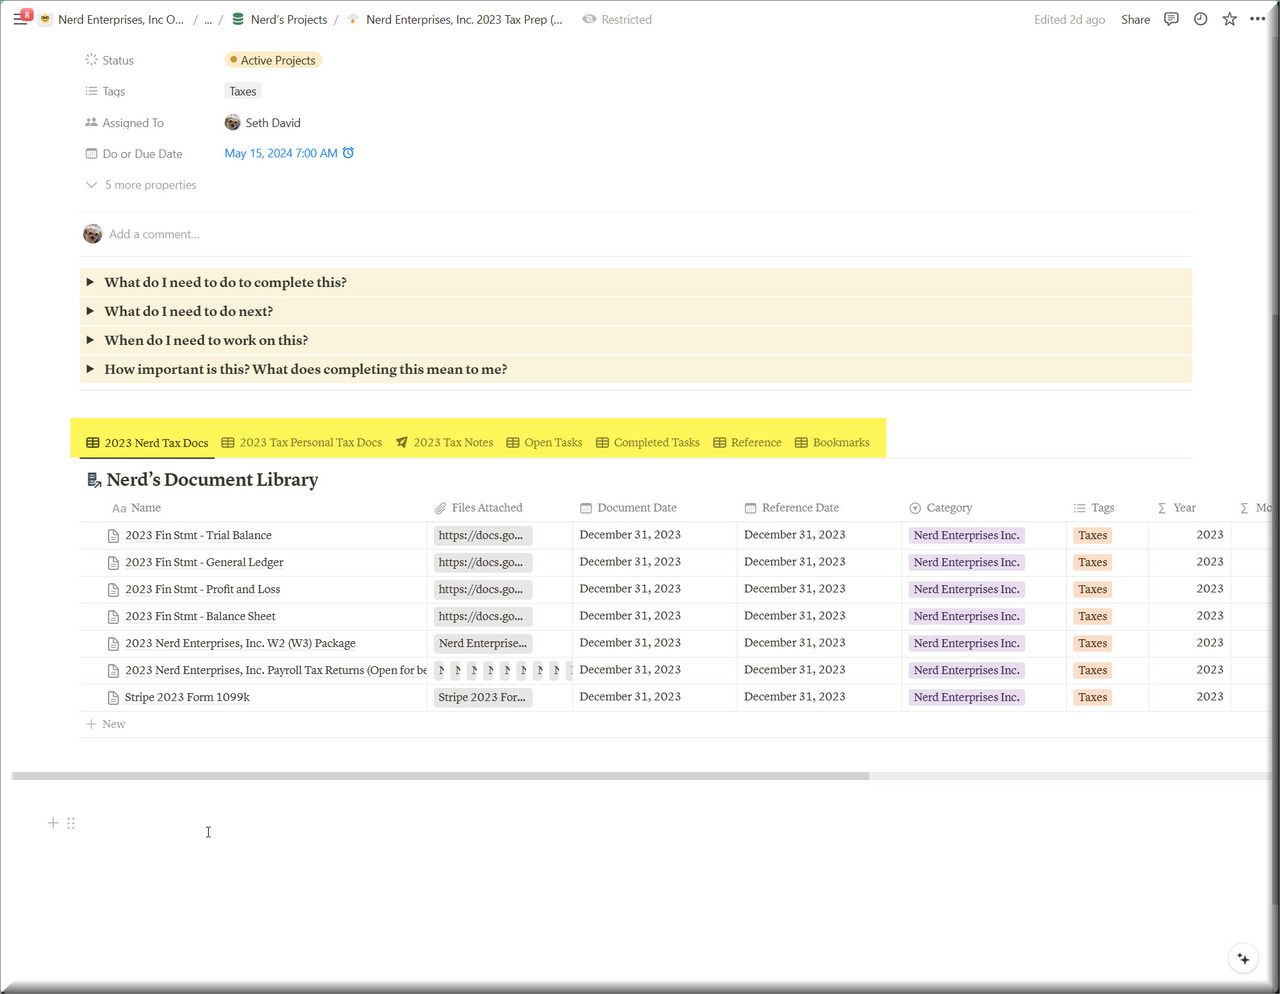
Note how I have everything I need linked in here, starting with documents, but also notes, tasks, reference items (which are tasks with the reference status), and even bookmarks. When I need to focus on this I don’t need to go anywhere but here to access the information I need, add new tasks, notes, and documents, and of course to reference anything about this project.
Now THIS is what I call Optimized for retrieval!!
ProTip:
Under Notes I have a note with a short video I recorded for my CPA to explain how this works.

When I sent this to him, I included a link directly to this note in my email, so he wouldn’t have to figure out where it is. He has not once had to ask me how to access anything, and we’ve had several rounds of questions and subsequent updates to this. I have also never seen them be so responsive.
Notes
For notes it works exactly the same as tasks. No need for me to re-explain it. Within any client you click on the same icon in the Quick Notes toggle and you’ll have a focused view of notes.
If you want something more “Global” use a project with a linked database to Notes.
Summary
What I really hope you can see by now, is that you can create a linked database anywhere, to any database in the system.
This is what makes this system truly geometric in nature.
You can add a task, and create a linked database for all notes with a particular theme where the task might be to follow upon all of these notes (eg update all notes with the Inbox status to something more permanent).
Bottom line, if you can conceive it, you can create it.
In the next lesson we’ll look at the “Workers Page” and how you can use that. Hint, it will be a review of everything you’ve just learned here, with a specific focus on collaborating with and delegating clients to others.
Then we’ll get right back into databases where I will finally invite you into “The Forbidden Zone.”
UP NEXT: LESSON 10
How to Use the Worker Pages
See ya in the next lesson ;-)
© Copyright 2024 Nerd Enterprises, Inc. All rights reserved. Reproduction or duplication of this content without our express written consent is strictly prohibited.
