
How To Use Snagit and Bublup for QuickBooks Online Tutorials
Aug 02, 2023If you have a YouTube channel like I do, then hopefully you get questions from people asking for your help.
This is a GREAT opportunity to help others get everything they want, so you can have everything you want.
Not everybody is a potential customer, but everybody can potentially refer people to you, and that is the great ROI you get from helping people.
Rule # 1: Never judge
A question someone asks you may be something really simple and obvious to you, but that is why you are where you are, and they are where they are. They don’t have your experience and knowledge. If they did, they wouldn’t need you. Always remember that. Always be grateful that they chose you to ask for help instead of someone else.
Here are the steps you can take to create an engaging and super helpful experience using Snagit and Bublup for QuickBooks Online Tutorials:
Step 1: Step through the process first
First, log into QuickBooks Online and confirm the steps yourself. Remember that the person you are doing this for is not familiar with QuickBooks Online the way that you are. Keep this in mind while you step through the process and ask yourself: What might not be obvious to an inexperienced user?
Step 2: Take and edit your screenshots
Step back through it and take your screenshots with Snagit. I like to edit each screenshot as I take it, so that I am 100% focused and zoomed in on that step. Again, think in terms of what the inexperienced eye might miss, and make it as ridiculously easy as you can.
The video for this article will walk you through how to edit the screenshots in Snag it. I am not going to take screenshots of myself editing screenshots. That would be really circular and confusing, I think.
Step 3: Set up your Bublup folder and drag and drop your screenshots there
Bublup is really intuitive and easy to use. Create a folder specifically for this tutorial and name it accordingly.
I named mine, “How To Turn On Locations in QuickBooks Online”.
Then drag and drop your edited screenshots into the folder.
Then arrange them in order.
Pro Tip:
As you create your images, number them to make this part go easier.
Fig 1-1 - [insert image name].
Fig 1-2 - … you get the point.
I didn’t do this in this case, because there were only three images and it was fairly simple, but I should have, because even when it is simple, this helps a lot.
Step 4: Create a Roll in Bublup and share it
Right click anywhere on the background of your folder in Bublup and choose “Roll”.
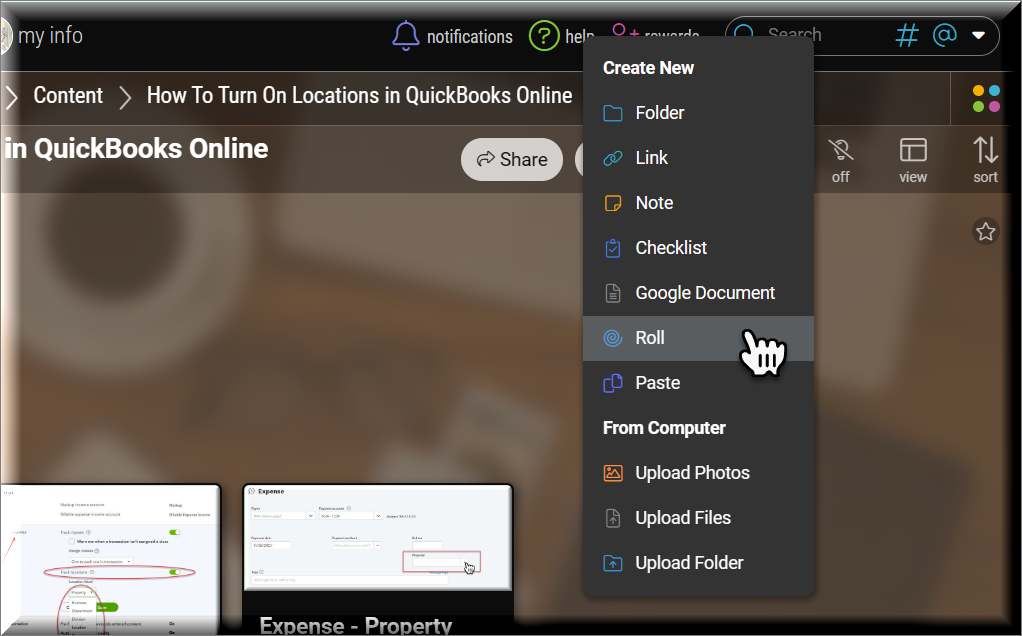
As long as you took the time to order the images correctly, Bublup will do the rest of the work for you.
Once the Roll is created, click in and confirm it looks OK.
You can edit the Roll, but that’s another tutorial for another day.
Scroll all the way down and you’ll find the Share link, which you can click to get the link and share it with whomever you need, wherever you need.
And now you have this tutorial memorialized, so the next time someone needs the link, you can grab it in a click and share it.
If I am looking for this later, I can type “Locations” in QuickBooks Online, and this will show up in the search well before I can finish typing that phrase.
Because that’s how Bublup rolls.
Get it?
OK, back to our regularly scheduled programming.
READY FOR BLAST OFF?
Hop On 'Nerd's Guide to the Galaxy' and Experience the Ultimate in FREE Coaching, Resources and Training...
- Live workshops, trainings and recordings
- An intimate community of like-minded people
- A FREE course (and you choose your interest)
- Preferred access to my inner circle
- A Free subscription to my newsletter "Nerd's Words"
- Blog Post Notifications
- And MUCH MORE!
We hate SPAM. We will never sell your information, for any reason.


